Difference between revisions of "Data Entry"
(→Via Data Entry) |
|||
| (49 intermediate revisions by one user not shown) | |||
| Line 2: | Line 2: | ||
= Entering Assessment Data into VCAT = | = Entering Assessment Data into VCAT = | ||
| − | VCAT is essentially a | + | VCAT is essentially a database that is home to a tremendous amount of valuable student data within your district/SU. In order for VCAT to be a useful tool for examining student data, the data must be entered into the VCAT system in a timely manner. To enter data into VCAT just follow these four simple steps. |
| − | == | + | == Four Simple Steps == |
| − | 1. After logging onto VCAT, select the Students. | + | '''1.''' After logging onto VCAT, [[Selecting Students|select the Students]]. |
| − | 2. Select the Information you wish to enter data for. | + | '''2.''' [[Selecting Information|Select the Information]] you wish to enter data for. |
| − | 3. Click on Enter Data | + | '''3.''' Click on Enter Data and set the Date Assessed. |
| − | + | By default, the date will be 'today's' date. | |
| + | [[File:Wiki2_calendar_default_date.png|250px]] | ||
| − | + | If that is the date you want to use as the assessment date, just click OK. | |
| − | + | If you wish to select a different day within the current month, select the day by clicking on it, then click on OK. | |
| − | + | If you wish to select a different month, use the up/down arrow where the month is listed and select the month you need. | |
| − | + | ||
| − | + | [[File:Wiki2_calendar_changeMonth.png|250px]] | |
| − | + | ||
| − | |||
| − | + | If you wish to select a different year, use the up/down arrow where the year is listed and select the year you need. | |
| − | + | [[File:Wiki2_calendar_changeYear.png|250px]] | |
| − | |||
| − | |||
| − | + | After changing the Month and/or Year, you do need to select the day by clicking on it, then click on OK. | |
| − | + | [[File:Wiki2_calendar_clickOnDay_then_ok.png|250px]] | |
| − | + | When the assessment date has been selected, it will show in the left column, above Enter Data. | |
| − | + | [[File:Wiki2_calendar_new_date.png|250px]] | |
| − | ''' | + | '''4. You are ready to enter the data!''' |
| + | |||
| + | == Four Data Entry Modes == | ||
| + | |||
| + | In every mode, the data entered is automatically saved. | ||
| + | |||
| + | === 1. All Students === | ||
By default, you are in the 'All Students' data entry mode, which gives you the full list of students from your selection in the left column, and a criterion per column. The top green row identified as 'All Students' allows you to enter data for a criterion for all students at once. When you select the score/value, the system might give you these options: Cancel, Change Empty, Change All. Clicking on Cancel will bring you back to the data entry window. Clicking on Change Empty will enter the data for all students that do not already have date entered - it will not cover previously entered values. Clicking on Change All will enter the data for all of the students, regardless if they already had data entered - it will replace any previously entered data for that criterion. | By default, you are in the 'All Students' data entry mode, which gives you the full list of students from your selection in the left column, and a criterion per column. The top green row identified as 'All Students' allows you to enter data for a criterion for all students at once. When you select the score/value, the system might give you these options: Cancel, Change Empty, Change All. Clicking on Cancel will bring you back to the data entry window. Clicking on Change Empty will enter the data for all students that do not already have date entered - it will not cover previously entered values. Clicking on Change All will enter the data for all of the students, regardless if they already had data entered - it will replace any previously entered data for that criterion. | ||
| Line 51: | Line 53: | ||
Clicking on one student name from the All Students Mode will bring you to Rubric Mode or Term Mode, if the unit has specific terms. | Clicking on one student name from the All Students Mode will bring you to Rubric Mode or Term Mode, if the unit has specific terms. | ||
| − | |||
| − | It will display the rubric for one student at a time - criteria listed in a column on the left with the possible values on the right. To enter data in this mode, simply click on the value to select. Clicking once more will unselect the value. The student you're on is showing in bold, at the top. To move from one student to another, click on the name of previous student or next student. | + | ==== Data Entry Types ==== |
| + | |||
| + | ===== Checkbox ===== | ||
| + | |||
| + | * A criterion with a square box represents a '''Checkbox''' type - clicking in the box will put a check for that criterion. | ||
| + | |||
| + | [[File:Wiki_DataEntry_Gr4_Persing_RepCardMath.png|1000px]] | ||
| + | |||
| + | |||
| + | ===== Drop-Down ===== | ||
| + | |||
| + | * A criterion with Up/Down arrows gives you the possible scores/values for the criterion in a '''Drop-Down Menu'''. Click on the score/value to select. | ||
| + | |||
| + | [[File:Wiki_DataEntry_Gr4_Persing_RepCardMath_CheckBox_DropDown.png|550px]] | ||
| + | |||
| + | |||
| + | ===== Text Field ===== | ||
| + | |||
| + | * A criterion with a rectangular box and little diagonal bars in the right bottom corner represents a '''Text Field'''. Even though the box is small, the field will accept an unlimited number of characters. Just type in the text you wish to enter. You can stretch that box to see all that you typed by clicking on the bottom right corner with diagonal lines and drag to expand. | ||
| + | |||
| + | [[File:Wiki_DataEntry_Gr4_Persing_RepCardMath_withDataT1.png|1000px]] | ||
| + | |||
| + | |||
| + | * When entering data in a rubric with multiple terms with notes/comments entered in previous term(s), the notes/comments entered in the text field(s) can be expanded by clicking on the note/comment. | ||
| + | |||
| + | [[File:Wiki_DataEntry_Gr4_Persing_RepCardMath_withDataT1_inT2_ClickToExpandTextField.png|1000px]] | ||
| + | |||
| + | |||
| + | * Once expanded, a previous term text field can be resized by clicking again on it to shrink it. | ||
| + | |||
| + | [[File:Wiki_DataEntry_Gr4_Persing_RepCardMath_withDataT1_inT2_ClickToShrinkTextField.png|1000px]] | ||
| + | |||
| + | |||
| + | ===== Score Range ===== | ||
| + | |||
| + | * When the criterion in the assessment rubric is designed with a score range (eg 0-10, 1-200, ...), a simple rectangular box is displayed. | ||
| + | |||
| + | [[File:Wiki_VCAT2_ScoreRange_box.png]] | ||
| + | |||
| + | |||
| + | * The box for the criterion with a score range will only accept a value/score within its range. If a value out-of-range is entered, the system will warn you, give you the acceptable scores based on the range, and will NOT save the out-of-score value. | ||
| + | |||
| + | [[File:Wiki_VCAT2_ScoreRange_box_OutOfRangeScore.png]] | ||
| + | |||
| + | === 2. Rubric Mode === | ||
| + | |||
| + | It will display the rubric for one student at a time - criteria listed in a column on the left with the possible values on the right. '''To enter data in this mode, simply click on the value to select''' - unless the criterion has a score range (simple box where you type in the value/score) or a text field (type in your note/comment). Clicking once more will unselect the value. The student you're on is showing in bold, at the top. To move from one student to another, click on the name of previous student or next student listed to the left and right of the current student. | ||
You can click on All Students to return to that mode, or click on Term to go to the Term Mode. | You can click on All Students to return to that mode, or click on Term to go to the Term Mode. | ||
| − | [[File: | + | [[File:Wiki_VCAT2_DataEntry_RubricMode2.png]] |
| − | |||
| − | Term Mode will display all the criteria in the left column with a column for each term on the right for one student at a time. The student you're on is also showing in bold, at the top. To move from one student to another, click on the name of previous student or next student. | + | When an '''individual''' student is selected (not a group of students), data entry is automatically in '''Rubric mode''', as opposed to the usual All Students mode. |
| + | |||
| + | [[File:Wiki2_IndivStudSelected_DataEntry_RubricMode.png|1000px]] | ||
| + | |||
| + | === 3. Term Mode === | ||
| + | |||
| + | Term Mode will display all the criteria in the left column with a column for each term on the right for one student at a time. The student you're on is also showing in bold, at the top. To move from one student to another, click on the name of previous student or next student listed to the left and right of the current student. | ||
You can click on All Students to return to that mode, or click on Rubric to go to the Rubric Mode. | You can click on All Students to return to that mode, or click on Rubric to go to the Rubric Mode. | ||
| Line 69: | Line 121: | ||
- If there are boxes with up/down arrows, click on the arrow to get the drop-down menu of the possible values, then click on the value to select. The data saves automatically. You can also use the 'tab' to go from one box to another and type in the value. If the value is out of range, it will not accept it and will show as if nothing has been entered. | - If there are boxes with up/down arrows, click on the arrow to get the drop-down menu of the possible values, then click on the value to select. The data saves automatically. You can also use the 'tab' to go from one box to another and type in the value. If the value is out of range, it will not accept it and will show as if nothing has been entered. | ||
| − | - If any scales are associated with the piece of data you just entered, each of the scales will show up where you | + | - If any scales are associated with the piece of data you just entered, each of the scales will show up where you enter the data and the Key to each of them will be displayed at the bottom of the window. |
| − | - If there are text fields, type in your notes/comments. When you are done typing, a little green check will appear shortly to let you know that the text you just entered has been saved. | + | - If there are text fields, type in your notes/comments. When you are done typing, a little green check will appear shortly after to let you know that the text you just entered has been saved. |
- If there are small square boxes, clicking in it will select it and place a check mark. Clicking once more will remove that check. | - If there are small square boxes, clicking in it will select it and place a check mark. Clicking once more will remove that check. | ||
- If there is a box like a text field but a numeric value/score needs to be entered, type in the score. If the score you typed is out of range, a message will warn you so you can retype the correct value. | - If there is a box like a text field but a numeric value/score needs to be entered, type in the score. If the score you typed is out of range, a message will warn you so you can retype the correct value. | ||
| + | |||
| + | |||
| + | === 4. Custom Mode === | ||
| + | |||
| + | * Custom mode allows the user to enter data in a 'form' format - which can be very useful for data entry like: EST, MTSS, Student Placement,... | ||
| + | |||
| + | * For clients interested in developing rubrics and custom reports of such, and clients who already have them in place, we will set up the Custom Data Entry forms for you, similar to what the Custom Reports pdfs look like. | ||
| + | |||
| + | * When a rubric has been set up for Custom Data Entry Mode, it will be the default mode when entering data for students. Other modes (All Students, Rubric, Term) will still be available. | ||
| + | |||
| + | == Export to PDF == | ||
| + | |||
| + | [[File:Wiki_VCAT2_Export_Student_to_PDF.png]] | ||
| + | |||
| + | |||
| + | This feature allows you to print the rubric with the student data. | ||
| + | |||
| + | Export All Students to PDF is available in all data entry modes. The export from this option will produce a pdf that includes all the students but each student on their own page(s). | ||
| + | |||
| + | Export Student to PDF will export a pdf with a single student; the student displayed on your screen. See sample below. | ||
| + | |||
| + | |||
| + | [[File:WIKI_VCAT2_ExportToPDF_sampleRubricPrintOut2.png]] | ||
| + | |||
| + | = Exporting / Importing Assessment Data = | ||
| + | |||
| + | == Via Data Entry == | ||
| + | |||
| + | |||
| + | * After [[Selecting Students|selecting the Students]], [[Selecting Information|selecting the Information]] you wish to enter data for, and selecting the Date Assessed, you are ready for Data Entry and have two options on the top right: '''Import''' and '''Export'''. | ||
| + | [[File:VCAT2_ExportImport_DataEntry.png|900px]] | ||
| + | |||
| + | * '''Export''' will allow you to export to csv to give you the file format you need to re-import the data. You can use that file to fill in the data then import that data, or simply use that file to verify the format and headers you need to set up an existing data file you already have. | ||
| + | |||
| + | [[File:VCAT2_ExportImport_DataEntry_ExportToCSV.png|200px]] | ||
| + | |||
| + | |||
| + | * '''Import''' will allow you to import data using a csv file. The only REQUIRED headers are: First Name, Last Name, and the criterion names. The students will be found only if their '''names are spelled exactly the same''' - it is '''NOT case sensitive'''. The importer will ignore any extra headers not needed. | ||
| + | |||
| + | [[File:VCAT2_DataEntry_Import_Upload.png|300px]] | ||
| + | |||
| + | |||
| + | * When First Name and Last Name are present in the import data file, the importer will find the students that perfectly match the first and last names in VCAT. '''If the names are spelled differently, the importer will not recognize the students''' and their data will not be imported. '''To prevent this issue''', you can remove the first and last name columns and only keep the Local and/or State ID to identify the students. | ||
| + | |||
| + | [[File:Wiki_VCAT2_DataEntryImport_NoMatchingStudents.png|300px]] | ||
| + | |||
| + | |||
| + | * After uploading your file, you are given the option to '''Override existing data'''. If you check that box, any existing data will be overridden by the data in the import file, if it is different than the existing data. | ||
| + | [[File:VCAT2_DataEntry_Import_OverrideExistingData.png|300px]] | ||
| + | |||
| + | |||
| + | * '''Your file can include more students''' than the ones listed in the Data Entry window but the importer will only import the data for the students selected. Any extra students or students with names that are not spelled exactly the same as the ones listed on the Data Entry window will be part of the students not found. | ||
| + | [[File:VCAT2_DataEntry_Import_Student_not_found.png|500px]] | ||
| + | |||
| + | |||
| + | * If there are '''duplicate students''' in the data import file, the system will also warn you '''"The following imported students were duplicates. Their data will not be applied."''' and will list the duplicate students after it lists the students not found. Make sure to scroll all the way down if the list is long. You should Cancel, remove the duplicates in your import file, before importing the data. | ||
| + | |||
| + | |||
| + | * Once imported, because you're in the Data Entry window, you will see the data right away. | ||
| + | |||
| + | |||
| + | * '''If any data in your import file is invalid''', the importer will warn you and only import the valid data. | ||
| + | [[File:VCAT2_DataEntryImport_ImportSuccessfulWithErrors.png|500px]] | ||
Latest revision as of 19:34, 6 February 2018
Entering Assessment Data into VCAT
VCAT is essentially a database that is home to a tremendous amount of valuable student data within your district/SU. In order for VCAT to be a useful tool for examining student data, the data must be entered into the VCAT system in a timely manner. To enter data into VCAT just follow these four simple steps.
Four Simple Steps
1. After logging onto VCAT, select the Students.
2. Select the Information you wish to enter data for.
3. Click on Enter Data and set the Date Assessed.
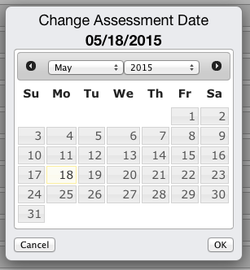
By default, the date will be 'today's' date.
If that is the date you want to use as the assessment date, just click OK.
If you wish to select a different day within the current month, select the day by clicking on it, then click on OK.
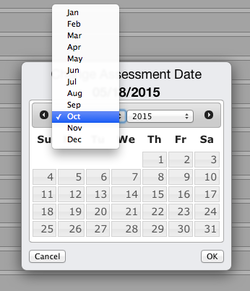
If you wish to select a different month, use the up/down arrow where the month is listed and select the month you need.
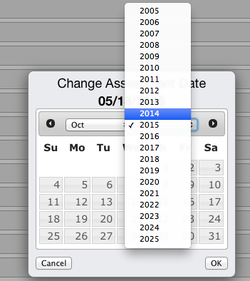
If you wish to select a different year, use the up/down arrow where the year is listed and select the year you need.
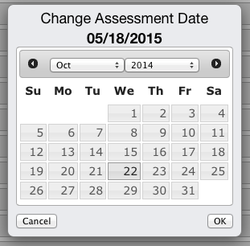
After changing the Month and/or Year, you do need to select the day by clicking on it, then click on OK.
When the assessment date has been selected, it will show in the left column, above Enter Data.
4. You are ready to enter the data!
Four Data Entry Modes
In every mode, the data entered is automatically saved.
1. All Students
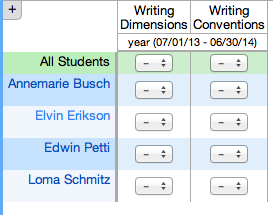
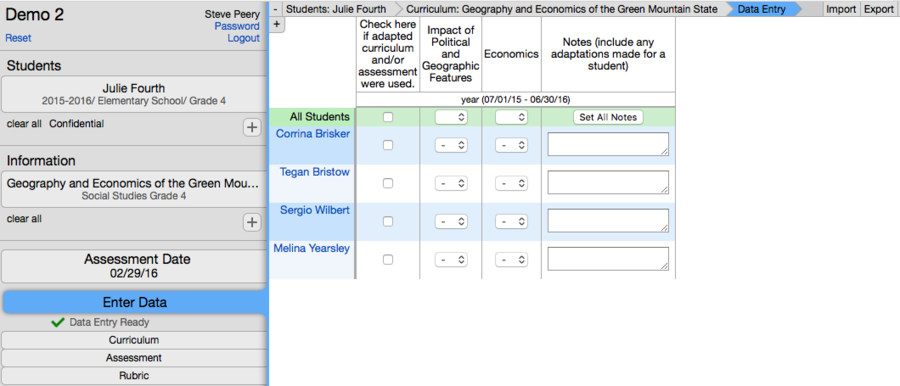
By default, you are in the 'All Students' data entry mode, which gives you the full list of students from your selection in the left column, and a criterion per column. The top green row identified as 'All Students' allows you to enter data for a criterion for all students at once. When you select the score/value, the system might give you these options: Cancel, Change Empty, Change All. Clicking on Cancel will bring you back to the data entry window. Clicking on Change Empty will enter the data for all students that do not already have date entered - it will not cover previously entered values. Clicking on Change All will enter the data for all of the students, regardless if they already had data entered - it will replace any previously entered data for that criterion.
Clicking on one student name from the All Students Mode will bring you to Rubric Mode or Term Mode, if the unit has specific terms.
Data Entry Types
Checkbox
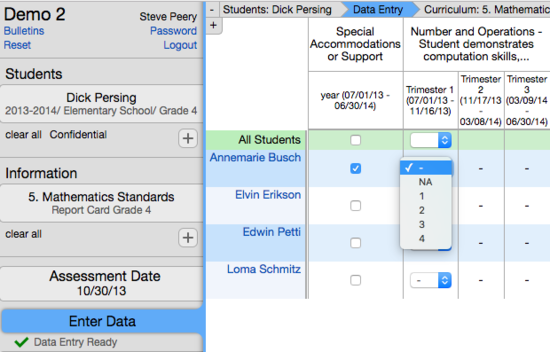
- A criterion with a square box represents a Checkbox type - clicking in the box will put a check for that criterion.
Drop-Down
- A criterion with Up/Down arrows gives you the possible scores/values for the criterion in a Drop-Down Menu. Click on the score/value to select.
Text Field
- A criterion with a rectangular box and little diagonal bars in the right bottom corner represents a Text Field. Even though the box is small, the field will accept an unlimited number of characters. Just type in the text you wish to enter. You can stretch that box to see all that you typed by clicking on the bottom right corner with diagonal lines and drag to expand.
- When entering data in a rubric with multiple terms with notes/comments entered in previous term(s), the notes/comments entered in the text field(s) can be expanded by clicking on the note/comment.
- Once expanded, a previous term text field can be resized by clicking again on it to shrink it.
Score Range
- When the criterion in the assessment rubric is designed with a score range (eg 0-10, 1-200, ...), a simple rectangular box is displayed.
- The box for the criterion with a score range will only accept a value/score within its range. If a value out-of-range is entered, the system will warn you, give you the acceptable scores based on the range, and will NOT save the out-of-score value.
2. Rubric Mode
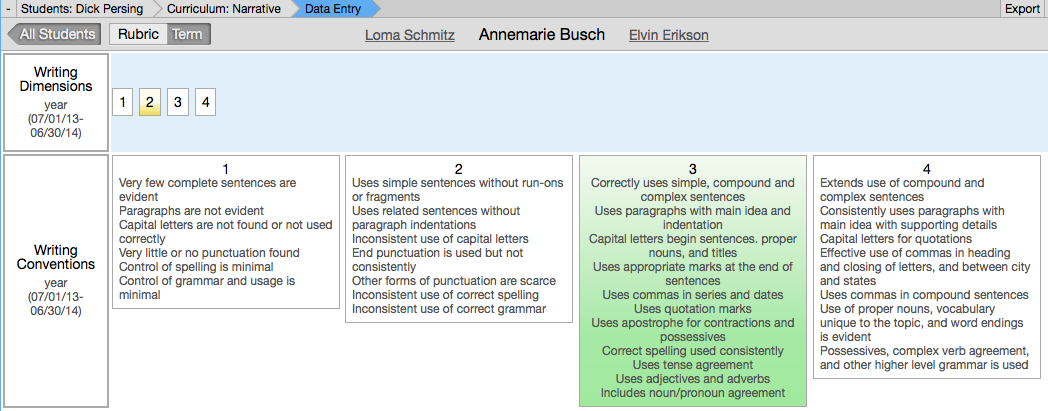
It will display the rubric for one student at a time - criteria listed in a column on the left with the possible values on the right. To enter data in this mode, simply click on the value to select - unless the criterion has a score range (simple box where you type in the value/score) or a text field (type in your note/comment). Clicking once more will unselect the value. The student you're on is showing in bold, at the top. To move from one student to another, click on the name of previous student or next student listed to the left and right of the current student.
You can click on All Students to return to that mode, or click on Term to go to the Term Mode.
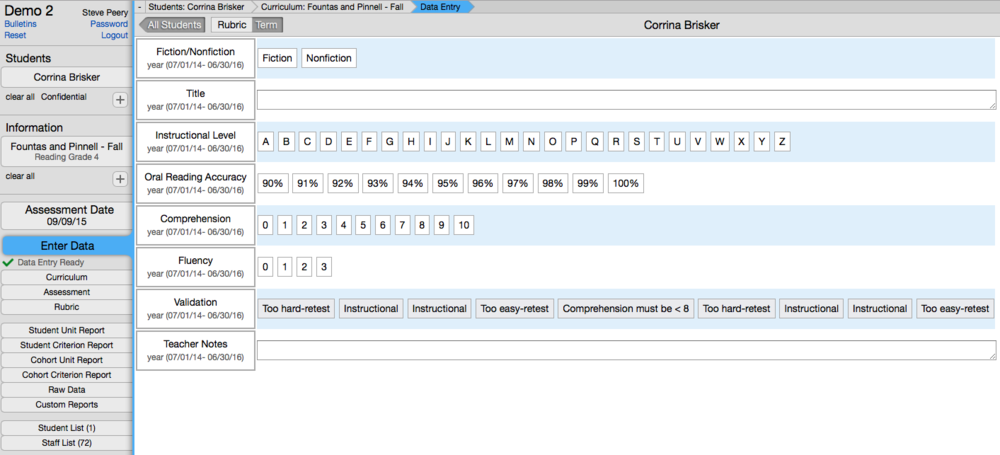
When an individual student is selected (not a group of students), data entry is automatically in Rubric mode, as opposed to the usual All Students mode.
3. Term Mode
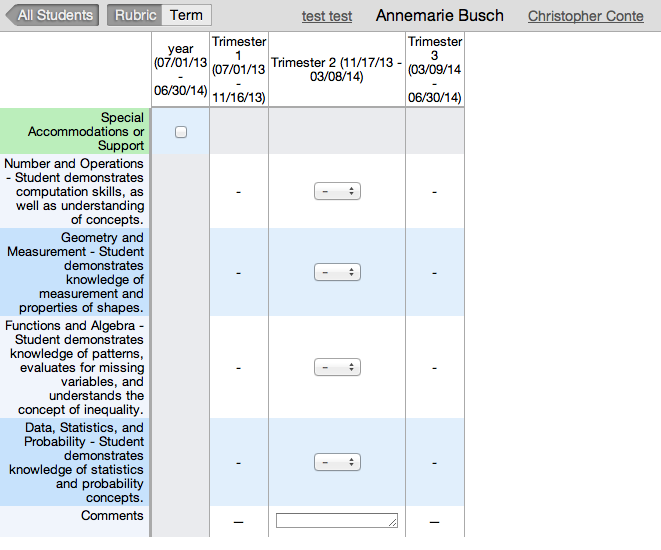
Term Mode will display all the criteria in the left column with a column for each term on the right for one student at a time. The student you're on is also showing in bold, at the top. To move from one student to another, click on the name of previous student or next student listed to the left and right of the current student.
You can click on All Students to return to that mode, or click on Rubric to go to the Rubric Mode.
- If there are boxes with up/down arrows, click on the arrow to get the drop-down menu of the possible values, then click on the value to select. The data saves automatically. You can also use the 'tab' to go from one box to another and type in the value. If the value is out of range, it will not accept it and will show as if nothing has been entered.
- If any scales are associated with the piece of data you just entered, each of the scales will show up where you enter the data and the Key to each of them will be displayed at the bottom of the window.
- If there are text fields, type in your notes/comments. When you are done typing, a little green check will appear shortly after to let you know that the text you just entered has been saved.
- If there are small square boxes, clicking in it will select it and place a check mark. Clicking once more will remove that check.
- If there is a box like a text field but a numeric value/score needs to be entered, type in the score. If the score you typed is out of range, a message will warn you so you can retype the correct value.
4. Custom Mode
- Custom mode allows the user to enter data in a 'form' format - which can be very useful for data entry like: EST, MTSS, Student Placement,...
- For clients interested in developing rubrics and custom reports of such, and clients who already have them in place, we will set up the Custom Data Entry forms for you, similar to what the Custom Reports pdfs look like.
- When a rubric has been set up for Custom Data Entry Mode, it will be the default mode when entering data for students. Other modes (All Students, Rubric, Term) will still be available.
Export to PDF
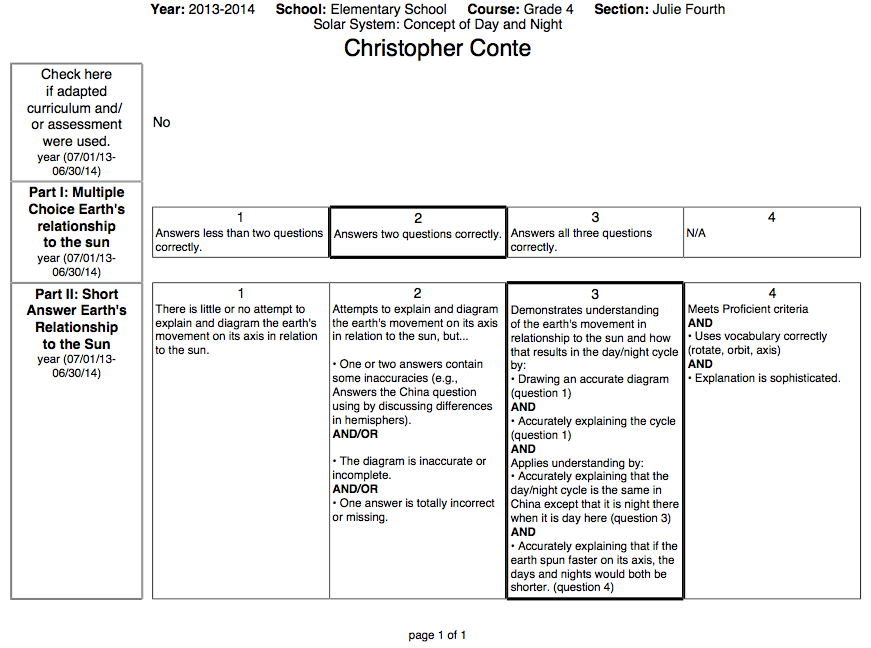
This feature allows you to print the rubric with the student data.
Export All Students to PDF is available in all data entry modes. The export from this option will produce a pdf that includes all the students but each student on their own page(s).
Export Student to PDF will export a pdf with a single student; the student displayed on your screen. See sample below.
Exporting / Importing Assessment Data
Via Data Entry
- After selecting the Students, selecting the Information you wish to enter data for, and selecting the Date Assessed, you are ready for Data Entry and have two options on the top right: Import and Export.
- Export will allow you to export to csv to give you the file format you need to re-import the data. You can use that file to fill in the data then import that data, or simply use that file to verify the format and headers you need to set up an existing data file you already have.
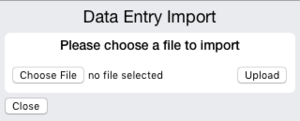
- Import will allow you to import data using a csv file. The only REQUIRED headers are: First Name, Last Name, and the criterion names. The students will be found only if their names are spelled exactly the same - it is NOT case sensitive. The importer will ignore any extra headers not needed.
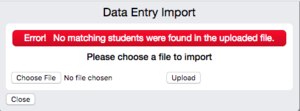
- When First Name and Last Name are present in the import data file, the importer will find the students that perfectly match the first and last names in VCAT. If the names are spelled differently, the importer will not recognize the students and their data will not be imported. To prevent this issue, you can remove the first and last name columns and only keep the Local and/or State ID to identify the students.
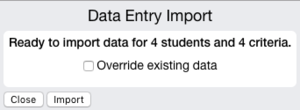
- After uploading your file, you are given the option to Override existing data. If you check that box, any existing data will be overridden by the data in the import file, if it is different than the existing data.
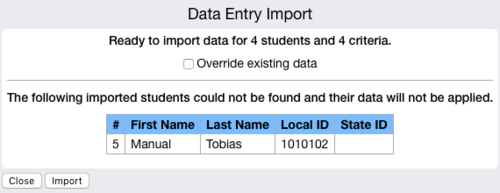
- Your file can include more students than the ones listed in the Data Entry window but the importer will only import the data for the students selected. Any extra students or students with names that are not spelled exactly the same as the ones listed on the Data Entry window will be part of the students not found.
- If there are duplicate students in the data import file, the system will also warn you "The following imported students were duplicates. Their data will not be applied." and will list the duplicate students after it lists the students not found. Make sure to scroll all the way down if the list is long. You should Cancel, remove the duplicates in your import file, before importing the data.
- Once imported, because you're in the Data Entry window, you will see the data right away.
- If any data in your import file is invalid, the importer will warn you and only import the valid data.
