Difference between revisions of "Updates"
(→Version 2.0.7.6) |
(→Version 2.0.7.6) |
||
| Line 3: | Line 3: | ||
== Version 2.0.7.6 == | == Version 2.0.7.6 == | ||
| − | * Added new Active feature for Custom Reports! | + | * '''Added new Active feature for Custom Reports!''' |
'''Under the A tab''', there is now an Active checkbox. | '''Under the A tab''', there is now an Active checkbox. | ||
| Line 23: | Line 23: | ||
[[File:Wiki_VCAT2_DataTab_CustomReports_ActiveOnlyUNCHECKED_wList.png|1100px]] | [[File:Wiki_VCAT2_DataTab_CustomReports_ActiveOnlyUNCHECKED_wList.png|1100px]] | ||
| + | |||
| + | |||
| + | |||
| + | * '''Added the ability to set the proficiency scale using a range of scores.''' | ||
| + | |||
| + | When Editing rubrics, click on Add Scale for the criterion you wish to edit and select Proficiency. It will add a row called Proficiency. | ||
| + | |||
| + | [[File:Wiki_VCAT2_ProficiencyScaleSelected.png]] | ||
| + | |||
| + | |||
| + | To edit the proficiency, click in the row. | ||
| + | |||
| + | [[File:Wiki_VCAT2_clickedProficiencyScaleRow.png]] | ||
| + | |||
| + | |||
| + | All the ratings are separated by little green knobs. To mark a proficiency range, hover over the green knob where you wish to divide the range. It will display ]|[. Click on it to set your divider. The divider will then show in blue. | ||
| + | |||
| + | [[File:Wiki_VCAT2_moveMouse_to_divider.png]] | ||
| + | |||
| + | [[File:Wiki_VCAT2_clicked_on_divider.png]] | ||
| + | |||
| + | |||
| + | If you wish to remove a divider, hover over with your mouse and it will show <X and X> in red on each side of the divider. | ||
| + | |||
| + | [[File:Wiki_VCAT2_remove_divider.png]] | ||
| + | |||
| + | |||
| + | If you click on the <X, the divider will be removed and the range will extend to the nearest divider on the left. | ||
| + | If you click on the X>, the divider will be removed and the range will extend to the nearest divider on the right. | ||
| + | |||
| + | |||
| + | Once you have the ranges set, click in that range within the proficiency row to set its proficiency level. | ||
| + | |||
| + | [[File:Wiki_VCAT2_setProficiencyLevel.png]] | ||
| + | |||
| + | [[File:Wiki_VCAT2_setProficiencyLevel2.png]] | ||
| + | |||
| + | |||
| + | To get out of edit mode for the proficiency scale, just click anywhere outside of that row. | ||
== Version 2.0.7.3 == | == Version 2.0.7.3 == | ||
Revision as of 14:28, 9 December 2015
This page informs you on the latest VCAT version and its improvements.
Version 2.0.7.6
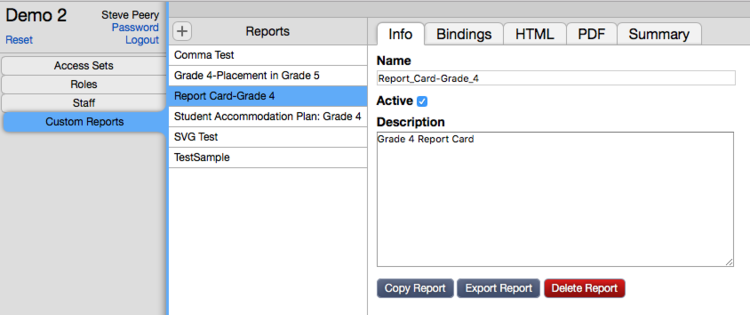
- Added new Active feature for Custom Reports!
Under the A tab, there is now an Active checkbox.
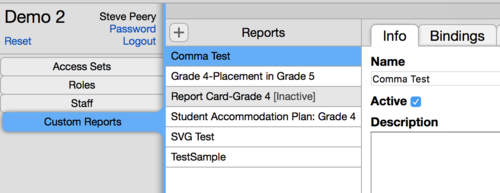
If you uncheck the Active box for the custom report selected, that report will become inactive. Every inactive custom reports will be marked with [Inactive] and shaded gray.
Under the Data tab, the Custom Reports list now has an Active Only checkbox in the filter bar, at the top. By default, the Active Only box is checked.
If you uncheck the Active Only box, all inactive custom reports will be included in the custom reports list.
- Added the ability to set the proficiency scale using a range of scores.
When Editing rubrics, click on Add Scale for the criterion you wish to edit and select Proficiency. It will add a row called Proficiency.
To edit the proficiency, click in the row.
All the ratings are separated by little green knobs. To mark a proficiency range, hover over the green knob where you wish to divide the range. It will display ]|[. Click on it to set your divider. The divider will then show in blue.
If you wish to remove a divider, hover over with your mouse and it will show <X and X> in red on each side of the divider.
If you click on the <X, the divider will be removed and the range will extend to the nearest divider on the left.
If you click on the X>, the divider will be removed and the range will extend to the nearest divider on the right.
Once you have the ranges set, click in that range within the proficiency row to set its proficiency level.
To get out of edit mode for the proficiency scale, just click anywhere outside of that row.
Version 2.0.7.3
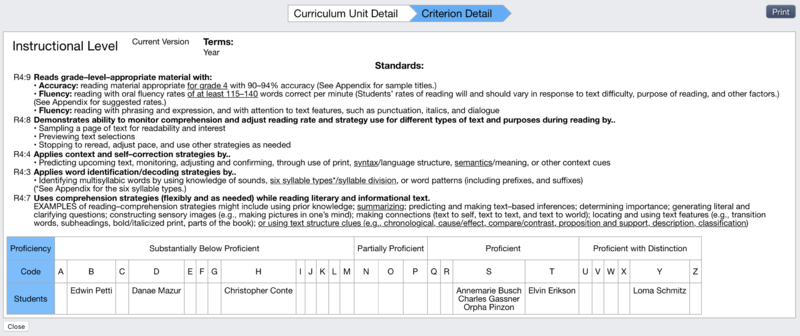
- Added print capability to the Criterion Detail report:
1.When running a criterion report (student criterion report or cohort criterion report), hover over the criterion name with your mouse to see the little blue i appear on the left.
2.Click on the i to create the Criterion Detail report. The print button will be at the top right corner.
- Updated styling of the retired curriculum units in the information selection. The units are shaded darker and identified with the word RETIRED preceding the unit names.
- Retired units are now hidden from the information list when the filter is set to 'Show information for data entry'. They can be made visible by checking the Show Retired box when the filter is set to either 'Show all information', 'Show current and historical information', or 'Show current information'. See example below.
- A tab (Admin tab): added the 'login as a user' feature to the staff section.
- Data import via Data Entry window works without student names, as long as the students have a Local ID and/or State ID.
- Fixes:
- In the Develop tab, filtering by retired units (Show Retired) has been fixed.
Version 2.0.7.0
- Custom Reports section under 'A' tab is now complete. It allows you to create custom reports; bindings, conditional, terms, PDF, view report, export/import fo files, export/import custom reports, copy report, and delete a report.
- New 'All Information' feature available for individual students. Under Individual tab, select student(s), click Select Information, select All Information at the top of the list, click on Raw Data (above Custom Reports). The data displays as a spreadsheet and can be exported.
- 'Ignores Automatic Updates' feature available at the Year, School, Course, and Section level. When checked, it will prevent the assignment import to change it.
- All Students note field data entry supports multiple lines, and now allows to remove notes from all students.
- Export to PDF with Colors!! You can now export a student criterion report that has colors into a pdf with colors as well.
- New Data Entry Export/Import: right from the Data Entry screen, a group of students with or without data can be exported, and reimported with new data. This feature no longer needs the complete curriculum paths in order to import data, it uses the criterion names from the unit selected.


