Difference between revisions of "Updates"
(→Version 2.0.8.0) |
(→Version 2.2.3.0 COMING SOON) |
||
| (156 intermediate revisions by 2 users not shown) | |||
| Line 1: | Line 1: | ||
This page informs you on the latest changes to VCAT, its version and improvements. | This page informs you on the latest changes to VCAT, its version and improvements. | ||
| + | |||
| + | == Version 2.2.3.0 == | ||
| + | |||
| + | * '''Adds the Export feature for Staff under the A tab.''' | ||
| + | |||
| + | * '''Adds the ability to remove the entire Rating Description row for a criterion.''' | ||
| + | |||
| + | * '''The Active Only checkbox in the custom reports filter is now available to all users.''' This allows all users to access custom reports, even the ones that have been marked inactive. | ||
| + | |||
| + | * '''Makes the 'Show Retired' option available to all users''' (not Full Access users only) '''where selecting information.''' | ||
| + | |||
| + | |||
| + | |||
| + | Fixes: | ||
| + | |||
| + | * The Export Staff List now respects the Sorting feature at the top of the filter menu. | ||
| + | |||
| + | * The Standard 4 Point criterion has been converted to be a 'Complete' type. | ||
| + | |||
| + | * Criterion type 4 Point Proficiency has now the correct proficiency level for each score. | ||
| + | |||
| + | == Version 2.2.2.0 == | ||
| + | |||
| + | * '''Adds a button (X) to remove a daily data entry date, if needed, in Custom Data Entry and Term Mode.''' The X button will show on the top right of the date header when hovering over it. | ||
| + | |||
| + | |||
| + | Custom Mode: | ||
| + | |||
| + | [[File:Wiki2_VCAT2_HoverOverMtgDate_X.png|700px]] | ||
| + | |||
| + | |||
| + | Term Mode: | ||
| + | |||
| + | [[File:Wiki2_VCAT2_HoverOverMtgDate_X_TermMode.png|700px]] | ||
| + | |||
| + | |||
| + | When clicking on the X button, you'll get a warning message that '''This cannot be undone'''. If you choose to hit the Delete button, all the data entered on that day for the student and rubric you have selected will be deleted. If you've clicked on the X by accident or changed your mind, hit the Cancel button. | ||
| + | |||
| + | [[File:Wiki2_VCAT2_X_ThisCannotBeUndone_Warning.png|300px]] | ||
| + | |||
| + | |||
| + | * '''Adds 'Show All Data In Data Entry' option for Custom Data Entry.''' | ||
| + | |||
| + | By default, the 'Show All Data In Data Entry' is unchecked in Custom Data Entry rubrics. This means that under Custom Mode and Term Mode with daily terms, only the Assessed Date shows by default. | ||
| + | |||
| + | This option is found and set when editing the Custom Data Entry under the Develop tab. | ||
| + | |||
| + | [[File:Wiki2_VCAT2_DevTab_DataEntry_ShowAllDataInDataEntry.png|800px]] | ||
| + | |||
| + | |||
| + | [[File:Wiki2_VCAT2_DevTab_DataEntry_ShowAllDataInDataEntry_Editing.png|800px]] | ||
| + | |||
| + | |||
| + | * '''Adds the ability to hide Demographic Sets, Demographic Variables, and Demographic Values.''' | ||
| + | |||
| + | There is now a new Active checkbox for demographics. When checked, the demographics are visible. When unchecked, the demographics are hidden. Users with FULL ACCESS will always see and have access to the demographics, no matter if they are marked Active or not. | ||
| + | |||
| + | For example, if you wish to no longer have an old NECAP demographic set visible, as it's no longer used by anyone, you can select it, uncheck Active, and hit Apply Changes (or Apply and Close) to save your change. When a demographic set is hidden (no longer visible to regular users), the demographic variables and values within that demographic set are also hidden. | ||
| + | |||
| + | Demographic variables and demographic values can also be independently set to be hidden within a demographic set that is still marked Active and, therefore, visible. | ||
| + | |||
| + | [[File:Wiki2_VCAT2_EditDemogSet_Active_AllDemVar_and_DemogValues.png|800px]] | ||
| + | |||
| + | |||
| + | [[File:Wiki2_VCAT2_EditDemogSet_ActiveRemoved_showInRed.png|800px]] | ||
| + | |||
| + | Any changes showing in red (something removed) or green (something edited or added) have NOT been saved yet. Remember to hit Apply Changes or Apply and Close to save the changes you've made. | ||
| + | |||
| + | |||
| + | Fixes: | ||
| + | * Only daily dates with data relevant to the student are now listed in Custom Data Entry mode, even when a group of students is selected. | ||
| + | |||
| + | == Version 2.2.1.1 == | ||
| + | |||
| + | Fixes: | ||
| + | |||
| + | * Reinstates 'User ID not found or Password Incorrect' message in red when the User ID or Password is wrong when trying to log in VCAT. | ||
| + | |||
| + | [[File:Wiki_VCAT2_LoginMessage_WrongPW.png]] | ||
| + | |||
| + | |||
| + | * 'No current assignments' would sometimes be displayed in the current staff list, even though the staff were assigned to the current year. This display issue has been fixed and will no longer cause confusion. | ||
| + | |||
| + | |||
| + | * Rubrics with criteria that have multiple different terms would sometimes cause columns to be misaligned in the data entry screen. This display issue has been fixed and all columns are lining up. | ||
| + | |||
| + | == Version 2.2.1.0 == | ||
| + | |||
| + | * '''New Google Sign-In option to log in VCAT!''' | ||
| + | |||
| + | This new feature can be turned on or off on the Site Details, under the A tab. '''By default, it is unchecked, therefore off.''' You can turn it on when you are ready for all users to have this option available to them. | ||
| + | |||
| + | [[File:Wiki_VCAT2_SiteDetails_under_Atab.png|900px]] | ||
| + | |||
| + | |||
| + | When Google Sign-In is NOT checked, the feature is off. | ||
| + | |||
| + | [[File:Wiki_VCAT2_GoogleSignIn_Unchecked.png|400px]] | ||
| + | |||
| + | |||
| + | When Google Sign-In is checked, the feature is on. | ||
| + | |||
| + | [[File:Wiki_VCAT2_GoogleSign-In_checked.png|400px]] | ||
| + | |||
| + | |||
| + | New login window with Google Sign-In: | ||
| + | |||
| + | [[File:Wiki_VCAT2_Login_GoogleSignIn_option.png|400px]] | ||
| + | |||
| + | |||
| + | In order for this new Google Sign-In feature to allow a staff to gain access to VCAT, the email address associated with the staff account in VCAT must be the same as the one used for the Google account. | ||
| + | |||
| + | Click on '''G Sign in''' to log in VCAT using your Google account. If you're already signed in Google with the account using the same email as the one entered in VCAT, you will automatically be logged in VCAT. | ||
| + | |||
| + | If you click on '''G Sign in''' and you have no email in VCAT or your email in VCAT isn't the same as the one associated with the Google account you're logged in with, you will get a message in red that reads: <u>'Google User not authenticated for this system.'</u> | ||
| + | |||
| + | |||
| + | [[File:Wiki_VCAT2_SignedIn_Google_w_diff_account_email.png|400px]] | ||
| + | |||
| + | |||
| + | If you click on '''G Sign In''' and you're not already signed in your Google account, the system will bring you to Google and allow you to sign in. Once you're signed in Google using the same email address as the one entered in VCAT, you'll automatically be logged in VCAT as well. | ||
| + | |||
| + | |||
| + | '''NOTE:''' Cookies must also be enabled for Google Sign-In to work. | ||
| + | |||
| + | == Version 2.2.0.4 == | ||
| + | |||
| + | * Now, when using a filter in a student report, the mean will be calculated based on the filter and will display as 'Filter Mean', instead of 'Mean'. | ||
| + | |||
| + | |||
| + | [[File:Wiki_VCAT2_StudentCriterionReport_Mean.png|900px]] | ||
| + | |||
| + | |||
| + | [[File:Wiki_VCAT2_Filters_Keep.png|400px]] | ||
| + | |||
| + | |||
| + | [[File:Wiki_VCAT2_Filters_Prof_less_than_3.png|900px]] | ||
| + | |||
| + | |||
| + | [[File:Wiki_VCAT2_FilterMean.png|900px]] | ||
| + | |||
| + | == Version 2.2.0.3 == | ||
| + | |||
| + | * Fix | ||
| + | ** Selecting an empty demographic category no longer displays all students. | ||
| + | |||
| + | == Version 2.2.0.1 == | ||
| + | |||
| + | * Fix | ||
| + | ** The recalculate button shows for a criterion when its sub criteria have data. | ||
| + | |||
| + | |||
| + | == Version 2.2.0.0 == | ||
| + | |||
| + | * Moves deployment to Amazon Web Services. No functional changes. | ||
| + | |||
| + | |||
| + | == Version 2.1.7.5 == | ||
| + | |||
| + | * Fixes | ||
| + | ** Under Data Entry, Export Student to PDF and Export All Students to PDF in Rubric Mode is working again! | ||
| + | ** The Confirmation Delete dialog when deleting student groups displays the entire message and allows Full Access users to delete student groups. | ||
| + | |||
| + | |||
| + | == Version 2.1.7.2 == | ||
| + | |||
| + | * '''New Custom Data Entry Mode!!''' This feature allows to enter data in a 'form' format - which can be very useful for data entry like: EST, MTSS, Student Placement,... For clients interested in developing rubrics and custom reports of such, and clients who already have them in place, we will set up the Custom Data Entry forms for you, similar to what the Custom Reports pdfs look like. | ||
| + | |||
| + | * '''Rating Description Field now expands vertically as a whole row when being edited.''' When hovering over the gray shaded bar below the rating description fields, an up and down arrow will be displayed. Just click on it to move up or down to either shrink or expand all of the rating fields at once. | ||
| + | |||
| + | [[File:VCAT2_Criterion_w_RatingDescriptions.png|800px]] | ||
| + | |||
| + | |||
| + | [[File:VCAT2_Criterion_w_RatingDescriptions_Expand_Vertically.png|800px]] | ||
| + | |||
| + | |||
| + | * '''Criterion Name Field now retains its original size when you go to edit it, and resizes appropriately when editing is complete.''' | ||
| + | |||
| + | * '''New Open/Close button icon for side panel.''' The button to close and open the side panel has now an arrow pointing left to close the left panel (column), or pointing right to reopen it. | ||
| + | |||
| + | |||
| + | [[File:VCAT2_New_HideShow_button_for_side_panel.png|500px]] | ||
| + | |||
| + | |||
| + | This is how the button looks when you hover over it with your mouse: | ||
| + | |||
| + | [[File:VCAT2_New_HideShow_button_for_side_panel_withMouseHover_Left.png|150px]] | ||
| + | |||
| + | |||
| + | [[File:VCAT2_New_HideShow_button_for_side_panel_withMouseHover_Right.png|150px]] | ||
| + | |||
| + | == Version 2.1.6.1 == | ||
| + | |||
| + | * '''In Custom Reports, there is now a new binding available called: Daily Term Newest First Repetition.''' When used in a repetition, it will allow data to be displayed by Most Recent to Oldest. The original binding that displayed Oldest data to Newest has been renamed: Daily Term Oldest First Repetition. | ||
| + | |||
| + | * '''Headers are now displayed on each page of a Student Criterion Report with multiple pages when printing.''' | ||
| + | |||
| + | * '''NEW Student Group Editor!''' | ||
| + | |||
| + | '''- The new Student Group Editor allows you to manually assign and unassign existing students and staff, link and unlink grades and curriculum, access any student group from within the same dialog, merge staff, students, and curriculum assignments between groups, and delete a group.''' | ||
| + | |||
| + | - To access the Group Editor dialog, simply hover hover a group and click on the '''i'''. | ||
| + | |||
| + | [[File:VCAT2_NewStudentGroupEditor_with_i_in_section2.png|400px]] | ||
| + | |||
| + | |||
| + | [[File:Wiki_VCAT2_?_hover_StudentGroupEditor.png|200px]] | ||
| + | |||
| + | |||
| + | - From within the dialog, you can access any other group on the left, and even edit multiple groups before saving your changes. | ||
| + | |||
| + | [[File:VCAT2_NewStudentGroupEditor_EditSectionInfo.png|700px]] | ||
| + | |||
| + | |||
| + | - When changes are made, the group directly affected will be displayed with a green solid border and its associated groups higher in the hierarchy with a dotted green border. The actual changes being added will be highlighted in green, and anything being removed will display in red with a strikethrough until changes are saved or cancelled. | ||
| + | |||
| + | [[File:VCAT2_NewStudentGroupEditor_EditSectionInfo_ChangesHighlighted.png|700px]] | ||
| + | |||
| + | |||
| + | - To Save your changes, you can either click on Apply Changes - to save the changes and remain in the edit dialog, or Apply and Close - to save the changes and close the dialog. | ||
| + | |||
| + | |||
| + | - The '''Merge feature''' is available at the Section, Course, School, and Year level, and each level offers options. For Staff, Curriculum, and Students assignments, you have the choice to Ignore, Add Missing, Remove Extra, or Make Match. | ||
| + | |||
| + | - Before clicking the Merge button, you have to select the Merge Target first. Once the Target is selected, then you click on Merge, select the Source, set the options, asend click Merge. | ||
| + | |||
| + | - No worries, when using the Merge feature, you will have the opportunity to review the changes involved with the merge (they will be highlighted) and make adjustments if needed before saving them. The Cancel button will also be available. | ||
| + | |||
| + | |||
| + | [[File:VCAT2_MergeStudentGroups_Section-Section.png|600px]] | ||
| + | |||
| + | |||
| + | [[File:VCAT2_MergeStudentGroups_Course-Course_choices.png|600px]] | ||
| + | |||
| + | |||
| + | [[File:VCAT2_MergeStudentGroups_School-School_choices.png|600px]] | ||
| + | |||
| + | |||
| + | [[File:VCAT2_MergeStudentGroups_Year-Year_choices.png|600px]] | ||
| + | |||
| + | |||
| + | - The new Student Group Editor is also used for '''Demographics Groups'''. It allows the user to edit Demographic Sets, Demographic Variables, and Demographic Values, and [[Demographics#Manual Updates|'''manually update''']] existing students demographics, as well as merging student assignments between demographic groups. | ||
| + | |||
| + | - The Merge feature is helpful if you are manually updating students demographics. In the example below, it is merging the students assignments from demographic set 2015-2016 into the one called 2016-2017. | ||
| + | |||
| + | [[File:VCAT2_DemogGroups_Set-Set.png]] | ||
| + | |||
| + | - Right after clicking the Merge button at the bottom right, an overview of the changes are presented in a word form. Just hit Continue to better see and understand the changes created by the Merge. | ||
| + | |||
| + | [[File:VCAT2_DemogGroups_Set-Set_mergeStudentGroups.png|300px]] | ||
| + | |||
| + | - When changes are made, the group directly affected will be displayed with a green solid border and its associated groups higher in the hierarchy with a dotted green border. The actual changes being added will be highlighted in green, and anything being removed will display in red with a strikethrough until changes are saved or cancelled. Any edits can still be done before changes are saved. | ||
| + | |||
| + | [[File:VCAT2_DemogGroups_Set-Set_GreenHighlights.png|700px]] | ||
| + | |||
| + | [[File:VCAT2_DemogGroups_Set-Set_GreenHighlightsChanges.png|700px]] | ||
| + | |||
| + | |||
| + | |||
| + | * Fixes: | ||
| + | ** The curriculum page prints correctly now in Chrome. | ||
| + | ** Data Import feature under Data Entry is no longer case sensitive. | ||
| + | ** Clicking Cancel while running a student criterion report with a filter no longer gives you an error. | ||
| + | ** Display has been improved on PDFs of vertical series report. | ||
| + | |||
| + | == Version 2.1.5.1 == | ||
| + | |||
| + | * '''A new tag [STUDENT_GRADE_ON_DATE] is now available to be used in custom reports to display the student grade on the date the report is run.''' | ||
| + | |||
| + | |||
| + | * '''The 'Time' term is now available under the Edit All Terms feature.''' | ||
| + | |||
| + | |||
| + | * Fixes: | ||
| + | ** Links to Demographic Value Conditional bindings are being saved and displayed correctly. | ||
| + | ** In reports, clicking the Clear button under the Groups & Demographics menu functions correctly and no longer causes an error. | ||
| + | |||
| + | == Version 2.1.5.0 == | ||
| + | |||
| + | |||
| + | * '''Allows daily data displayed in custom reports to be limited by terms.''' | ||
| + | |||
| + | |||
| + | * '''When an individual student is selected, data entry is automatically in Rubric mode, as opposed to the usual All Students mode.''' | ||
| + | |||
| + | [[File:Wiki2_IndivStudSelected_DataEntry_RubricMode.png|1000px]] | ||
| + | |||
| + | |||
| + | * '''Clicking outside of a dialog with a Close or Cancel button closes or cancels the dialog without having to click directly on the button.''' | ||
| + | |||
| + | |||
| + | * '''Improves the navigation in the Develop section by maintaining the selected page when appropriate and pre-selecting either the curriculum, assessment, or rubric page (in that order) as the initial page, based on which one has content.''' | ||
| + | |||
| + | |||
| + | * '''Allows a different default role to be selected for the import process and for manual staff assignment.''' | ||
| + | |||
| + | To set the default role, go to A tab, Roles, click the Edit button in front of the role you want to set as default, click on Make Default, hit Save. By selecting a role to be set as default also unselects the role previously set as default. | ||
| + | |||
| + | [[File:Wiki2_SettingDefaultRole_TeamTeacher.png|800px]] | ||
| + | |||
| + | |||
| + | [[File:Wiki2_DifferentDefaultRoleSelected.png|800px]] | ||
| + | |||
| + | |||
| + | * '''Adds a confirmation dialog in the Upload to VCAT feature when uploading a file that will replace an existing one.''' | ||
| + | |||
| + | [[File:Wiki2_UploadToVCAT_ConfirmationDialog.png|400px]] | ||
| + | |||
| + | |||
| + | * '''Moves the Hispanic or Latino demographic under the 'Permanent' demographic set.''' | ||
| + | |||
| + | |||
| + | * Fix: | ||
| + | **Date data in data entry section is now displayed as dd/mm/yy. | ||
| + | |||
| + | == Version 2.1.4.2 == | ||
| + | |||
| + | '''* Dramatically improves report generation time.''' | ||
| + | |||
| + | '''* New Year Info, School Info, and Course Info dialogs if needed to be manually created.''' When using the importer to update students and teachers assignments, the importer takes care of adding the schools, courses, and the new year as well, but if you want to manually add the new year, you can now do so by clicking the little '+' sign at the bottom of the Year column, under the Data tab. | ||
| + | |||
| + | |||
| + | [[File:Wiki2_2.1.4.2_CreateNewYearInfo.png|500px]] | ||
| + | |||
| + | The new Year Info dialog lets you enter date ranges at the same time you create a new year. Click in 'New Year Info' field to rename the year. Click on Save Year Info to save. | ||
| + | |||
| + | |||
| + | [[File:Wiki2_2.1.4.2_CreateNewSchoolInfo.png|500px]] | ||
| + | |||
| + | The new School Info dialog lists the schools to choose from, and displays any staff that may be assigned at the Year level. Click on Save School Info to save. | ||
| + | |||
| + | |||
| + | [[File:Wiki2_2.1.4.2_CreateNewCourseInfo2.png|500px]] | ||
| + | |||
| + | The new Course Info dialog allows you to link curriculum as you create the new course, and displays any staff that may be assigned at the Year and School levels. | ||
| + | |||
| + | |||
| + | '''* Adds tool tip (?) to curriculum nodes that gives information on any Type, Grade, and Subject linked to that curriculum.''' No matter if it is a curriculum folder, course, or unit, Type, Grade, and Subjects links (all three) will show if there are any links made at that level or inherited from a higher level. | ||
| + | |||
| + | To get the tool tip to show, simply hover over to the right of the curriculum name. | ||
| + | |||
| + | Example of a curriculum folder (SBAC) with only the Type linked to it: | ||
| + | |||
| + | [[File:Wiki2_2.1.4.2_CurriculumFolder_toolTip.png]] | ||
| + | |||
| + | Example of a curriculum course (SBAC Grade 3) with the Type, and Grade links: | ||
| + | |||
| + | [[File:Wiki2_2.1.4.2_CurriculumCourse_toolTip.png]] | ||
| + | |||
| + | Example of a curriculum unit (ELA/Literacy) with the Type, Grade, and Subject links: | ||
| + | |||
| + | [[File:Wiki2_2.1.4.2_CurriculumUnit_toolTip.png]] | ||
| + | |||
| + | == Version 2.1.3.0 == | ||
| + | |||
| + | * '''The Bulletins blue link only shows if there is at least one bulletin.''' | ||
| + | |||
| + | * '''If any bulletins are 'Active', the number of active bulletins will display to the right of the Bulletins blue link.''' | ||
| + | |||
| + | [[File:Wiki2_VCAT2_BulletinsLink_Active.png|80px]] | ||
| + | |||
| + | * '''You can now set an Expiration Date on Bulletins!''' Setting the date a bulletin expires on will allow that bulletin to remain active until that specific day. | ||
| + | |||
| + | [[File:Wiki2_VCAT2_Bulletins_ExpirationDate.png|900px]] | ||
| + | |||
| + | * '''Fixes:''' | ||
| + | ** Rating descriptions are now preserved when importing curriculum units. | ||
| + | ** When running the SECT reports, the # of entries and page info update when the selection is changed. | ||
| + | |||
| + | == Version 2.1.2.1 == | ||
| + | |||
| + | * '''New SECT Section now available under the 'A' tab. This year, SUs will be able to upload their SECT files DIRECTLY to the State right from VCAT!!!''' Check out the [[SECT| SECT section]] of the Wiki. | ||
| + | |||
| + | |||
| + | * '''New Birth Date format (mm/dd/yyyy)''' will sort in chronological order in the reports when this student field is the first column. | ||
| + | |||
| + | |||
| + | * '''Select Information is now grayed out with a message showing below it that reads 'Select a course or section to select information' when only a Year or Year/School has been selected.''' | ||
| + | |||
| + | [[File:Wiki2_VCAT2_SelectInformation_grayedOut_Year.png|150px]] and [[File:Wiki2_VCAT2_SelectInformation_grayedOut_Year_and_School.png|150px]] | ||
| + | |||
| + | |||
| + | * '''New feature: Bulletins!''' You now have the ability to add messages that will pop up when users log in VCAT. Priority level (Low, Medium, High) can be set for each message, and they can be individually marked Active (or not) as well. | ||
| + | |||
| + | Priority Levels | ||
| + | |||
| + | [[File:Wiki2_VCAT2_PriorityLevels.png]] | ||
| + | |||
| + | |||
| + | When a bulletin is NOT marked as Active (therefore Inactive), its priority will display as a circle (with its priority color), and will be 'closed' - meaning its message will not be automatically displayed. You can simply click on its title to get it to open to display it. | ||
| + | |||
| + | [[File:Wiki2_VCAT2_Inactive_display_LogIn.png|900px]] | ||
| + | |||
| + | |||
| + | Once the Bulletins window has been closed, you can access them again by clicking on the Bulletins blue link, at the top left, right under your SU/District name (here under Demo 2): | ||
| + | |||
| + | [[File:Wiki2_VCAT2_Bulletins_blueLink.png]] | ||
| + | |||
| + | |||
| + | To add, delete, and edit bulletins, you need to go to the 'A' tab and click on Bulletins listed on the left. | ||
| + | |||
| + | [[File:Wiki2_VCAT2_Bulletins_A_tab2.png]] | ||
| + | |||
| + | |||
| + | If you click on Edit in front of a bulletin, you can edit its status (Active or not), set its priority level (Low, Medium, High), edit the title by clicking on it and typing what you need, edit the bulletin text right in the box below the title, delete the bulletin by clicking on Delete button on the bottom right corner, and click the Save button when you are done making any changes and want to keep them. The Cancel button will get you out without saving any changes. The Bulletin Preview lets you view what the actual message will look like: | ||
| + | |||
| + | [[File:Wiki2_VCAT2_Bulletins_Editing.png]] | ||
| + | |||
| + | |||
| + | * '''The feature 'All Students/Raw Data' used to search for the data ever entered for a particular assessment is now faster than ever!''' | ||
| + | |||
| + | |||
| + | * '''New 'Upload to VCAT' feature!''' This feature allows for a secure upload of your files to our ftp server. Under the 'A' tab, click on Upload to VCAT. | ||
| + | |||
| + | [[File:Wiki2_VCAT2_UploadFilesToVCAT.png]] | ||
| + | |||
| + | |||
| + | * '''Fixes:''' | ||
| + | ** You can now use demographics in your student selection for data entry. | ||
| + | ** When editing students, the demographics are now listed in the same order as they are in your system under the Demographics tab. | ||
| + | |||
| + | == Version 2.1.1.2 == | ||
| + | |||
| + | * '''Adds the ability to expand the text visible in previously entered text fields'''. | ||
| + | |||
| + | Initially, the previously entered text field may only show part of the text. | ||
| + | |||
| + | [[File:Wiki_VCAT2_TextField1.png|300px]] | ||
| + | |||
| + | Simply click anywhere in the previous text cell to expand it. | ||
| + | |||
| + | [[File:Wiki_VCAT2_TextField2.png|400px]] | ||
| + | |||
| + | Once expanded, click again to shrink it. | ||
| + | |||
| + | [[File:Wiki_VCAT2_TextField3.png|400px]] | ||
| + | |||
| + | |||
| + | * '''Adds the Birth Date and Email to Student Fields in the reports.''' | ||
| + | [[File:Wiki_VCAT2_Reports_StudentFields_newOnesIncluded_.png|120px]] | ||
| + | |||
| + | |||
| + | * '''Gender Demographic is now part of the demographic set called 'Permanent' in the new importer.''' | ||
| + | |||
| + | |||
| + | * '''Adds a document tag [DOB] for Birth Date in custom reports.''' | ||
| + | |||
| + | |||
| + | * '''Fixes:''' | ||
| + | ** '''Under Student Fields in the reports, the Reset button has been removed and the Clear button now resets to the default student fields of Last Name and First Name.''' | ||
| + | |||
| + | [[File:Wiki_VCAT2_Reports_StudentFields_newOnesIncluded_.png|120px]] | ||
| + | |||
| + | == Version 2.1.1.0 == | ||
| + | |||
| + | * '''Adds new Student Fields: Middle Name, Birth Date, Email'''. | ||
| + | |||
| + | The new student fields are available under the Information tab, when editing a student account, and can also be imported using the new importer! | ||
| + | |||
| + | [[File:VCAT2_StudentInformation_NewFields.png|300px]] | ||
| + | |||
| + | |||
| + | * '''Adds an Importer to take care of students and teachers assignments, new student fields, AND student demographics as well.''' | ||
| + | |||
| + | The Importer uses the files that have been uploaded to our '''FTP server'''. In order for the Importer to read and process those files correctly, we first need to set up an agent for you. | ||
| + | |||
| + | The '''file format''' has to be '''.csv''' (comma separated values) or '''.txt''' (tab delimited text). | ||
| + | |||
| + | Here's a '''sample''' file: | ||
| + | |||
| + | [[File:VCAT2_SampleImportFile_HS.png]] | ||
| + | |||
| + | This sample file has headers but they are not required. If your files don't have headers, we'll need to know what each column represents in order to set up the agent. | ||
| + | |||
| + | As for demographics, each column has its own demographic (IEP, 504, SES,...), and the text within the fields is the demographic value (Yes, M, ...). | ||
| + | |||
| + | |||
| + | The Import feature is accessible under the A (Admin) tab. | ||
| + | |||
| + | [[File:VCAT2_A_Tab_Import.png]] | ||
| + | |||
| + | Once your files have been uploaded to our FTP server and your agent has been set up, you will simply click on 'Go to Importer' to run the import. | ||
| + | |||
| + | The importer will present you with information on New Records and/or Merged Records, if any. | ||
| + | |||
| + | [[File:Wiki_VCAT2_Importer.png|700px]] | ||
| + | |||
| + | The '''New Records''' include new students and/or staff, and their new assignments, and/or demographics. | ||
| + | |||
| + | '''Merged records''' are the changes to existing students and/or staff accounts that the importer will make. | ||
| + | |||
| + | '''It is strongly recommended that you go through every section to verify that the information is accurate before finalizing the import.''' | ||
| + | |||
| + | Those changes will only apply after you click on '''Save Import''' and then, click on '''Reset and Reload''' to update VCAT. | ||
| + | |||
| + | If you wish to get out of the importer, you can click on the '''Exit''' button on the top left of the screen. If you just need to make a quick change in VCAT to adjust something, you can do so and then come back and click '''Restart Import'''. | ||
| + | |||
| + | Under Merged Records: Students, you will find students with any '''student field changes''' (State ID, Last Name, First Name, Middle Name, Birth Date, Graduation Year, Email). | ||
| + | |||
| + | If there are any '''new students''', you will get a '''RED warning'''. It is very important to verify that every student listed as new does not already exist in VCAT. This will prevent duplicate students. | ||
| + | |||
| + | If there are any '''new staff''', you will get a similar '''RED warning''' as well. It is also very important to verify that every staff listed as new does not already exist in VCAT. Again, this will prevent duplicate accounts, and possible staff access problems. | ||
| + | |||
| + | [[File:Wiki_VCAT2_Importer_NewStaff.png|300px]] | ||
| + | |||
| + | |||
| + | * '''Fixes:''' | ||
| + | ** The criterion type 'Related Data' now displays correctly - with the proficiency level colored background and its corresponding value with an asterisk to indicate it is coming from supporting data. | ||
| + | |||
| + | == Version 2.0.8.4 == | ||
| + | |||
| + | * '''Adds a State ID check when manually creating a new student account or editing an existing one'''. | ||
| + | |||
| + | [[File:VCAT2_StudentStateIDMustBeUnique.png|400px]] | ||
| + | |||
| + | |||
| + | * '''To emphasize the scale that is entered on the data entry page, its row is now colored light blue in the rubric view when multiple scales are assigned to the criterion.''' | ||
| + | |||
| + | [[File:Wiki2_VCAT2_MultScales_blueRow_dataEntry.png|800px]] | ||
| + | |||
| + | |||
| + | |||
| + | * '''Fixes:''' | ||
| + | ** In Individual Series report when students individually selected, the report now displays the student name above each section. | ||
| + | ** In Rubric View when under the Data tab, the scroll bar is now visible. | ||
| + | ** Copying a unit using Numeric Sum criteria now keeps the criteria and the proficiencies associated with them. | ||
| + | |||
| + | == Version 2.0.8.3 == | ||
| + | |||
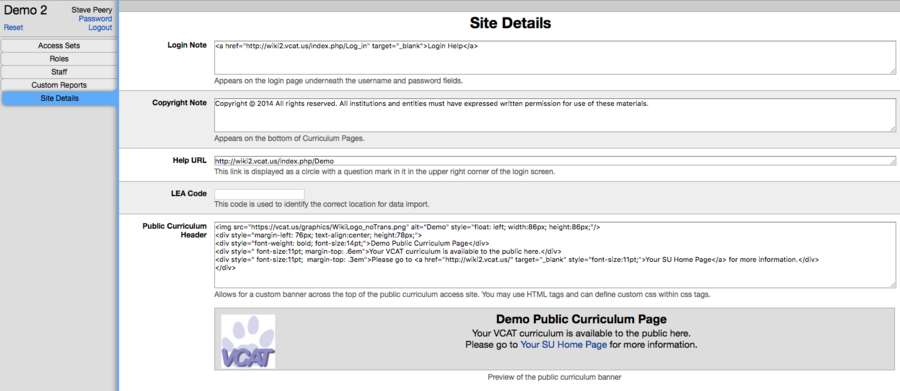
| + | * '''Adds a new 'Site Details' page under the A (admin) tab''' that includes the following: | ||
| + | |||
| + | [[File:Wiki2_VCAT2_SiteDetailsPage_w_VCAT_logoInfo2.png|900px]] | ||
| + | |||
| + | |||
| + | '''Login Note:''' This is used when you want to include a link that appears on the login page, right underneath the username and password fields. In this sample, the link is called 'Login Help' and brings the user right to the Log In/Log Out section of the Wiki. | ||
| + | |||
| + | [[File:Wiki2_VCAT2_SiteDetails_LoginNote_HelpURL.png]] | ||
| + | |||
| + | |||
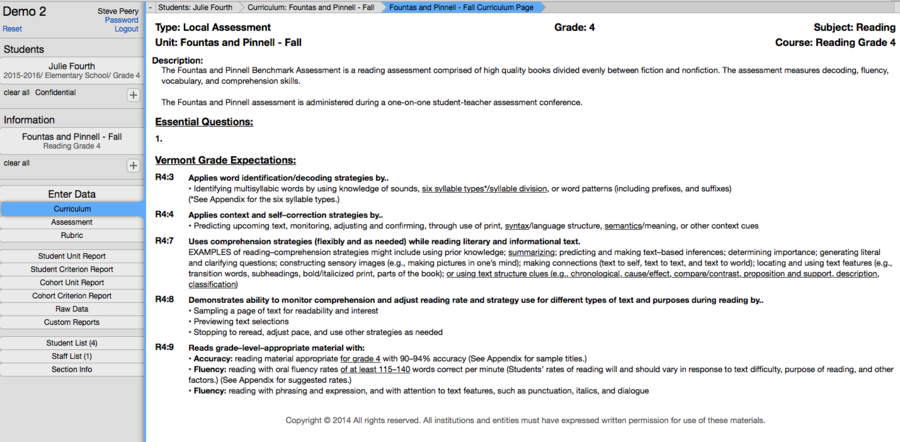
| + | '''Copyright Note:''' This information appears on the bottom of Curriculum pages. | ||
| + | |||
| + | [[File:Wiki2_VCAT2_Copyright_sample_on_currPage2.png|900px]] | ||
| + | |||
| + | |||
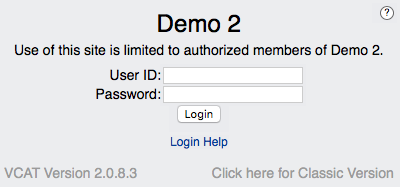
| + | '''Help URL:''' This link is displayed as a circle with a question mark in it in the upper right corner of the login screen when your mouse hovers over. | ||
| + | |||
| + | [[File:Wiki2_VCAT2_SiteDetails_HelpURL2.png]] | ||
| + | |||
| + | |||
| + | '''Public Curriculum Header:''' This field allows you to create a custom banner across the top of the public curriculum access site. You may use HTML tags and can define custom css within css tags. There is also a preview of the public curriculum banner right below the field. You can view a sample of a Public Page below. | ||
| + | |||
| + | |||
| + | * '''New Public Page layout.''' The public page has been redesigned with the format of VCAT2. The curriculum made public is listed on the left and only gives access to the Curriculum page of the units. | ||
| + | |||
| + | [[File:Wiki2_VCAT2_newPublicPage_with_Logo.png|900px]] | ||
| + | |||
| + | |||
| + | [[File:Wiki2_VCAT2_newPublicPage_CurriculumPageSample2.png|900px]] | ||
| + | |||
| + | |||
| + | * '''Adds a new binding called 'Assessment Date'''' to display the date assessed when used in Custom Reports. | ||
| + | |||
| + | |||
| + | |||
| + | * '''Fixes:''' | ||
| + | ** The Export feature is now working for Individual Series report. | ||
| + | ** 'Show Category Mean' option is now functional. | ||
| + | ** Clicking on Individual Students works correctly now with a slow click. | ||
| + | ** When running reports for Individual Students as the cohort in Confidential Mode, the cohort listed also becomes confidential - just like each individual student. | ||
| + | ** Criterion with long list of numeric values are no longer shortened (displayed with '...') when it has other scales assigned. | ||
== Version 2.0.8.0 == | == Version 2.0.8.0 == | ||
| Line 45: | Line 615: | ||
| − | * '''Adds the ability to run previous year's custom report for a current student group.''' You can now select a current student group, click on Custom Reports, select last year's report card | + | * '''Adds the ability to run previous year's custom report for a current student group.''' You can now select a current student group, click on Custom Reports, select a custom report (last year's report card for example), set the date in the calendar that pops up to a previous year's date, and the system will pull the data from that year onto the custom report. If the report pulls general information like 'Year', 'School', and 'Section', the Year will be filled in based on the date selected in the calendar, but the School and Section will be filled in based on the student group selected. You can edit those fields by typing in the appropriate information, if need be, before creating the pdf. |
[[File:Wiki2_VCAT2_PreviousYear_CustomReport.png|400px]] | [[File:Wiki2_VCAT2_PreviousYear_CustomReport.png|400px]] | ||
Latest revision as of 20:19, 16 January 2019
This page informs you on the latest changes to VCAT, its version and improvements.
Contents
- 1 Version 2.2.3.0
- 2 Version 2.2.2.0
- 3 Version 2.2.1.1
- 4 Version 2.2.1.0
- 5 Version 2.2.0.4
- 6 Version 2.2.0.3
- 7 Version 2.2.0.1
- 8 Version 2.2.0.0
- 9 Version 2.1.7.5
- 10 Version 2.1.7.2
- 11 Version 2.1.6.1
- 12 Version 2.1.5.1
- 13 Version 2.1.5.0
- 14 Version 2.1.4.2
- 15 Version 2.1.3.0
- 16 Version 2.1.2.1
- 17 Version 2.1.1.2
- 18 Version 2.1.1.0
- 19 Version 2.0.8.4
- 20 Version 2.0.8.3
- 21 Version 2.0.8.0
- 22 Resources 12.9.15
- 23 Version 2.0.7.6
- 24 Version 2.0.7.3
- 25 Version 2.0.7.0
Version 2.2.3.0
- Adds the Export feature for Staff under the A tab.
- Adds the ability to remove the entire Rating Description row for a criterion.
- The Active Only checkbox in the custom reports filter is now available to all users. This allows all users to access custom reports, even the ones that have been marked inactive.
- Makes the 'Show Retired' option available to all users (not Full Access users only) where selecting information.
Fixes:
- The Export Staff List now respects the Sorting feature at the top of the filter menu.
- The Standard 4 Point criterion has been converted to be a 'Complete' type.
- Criterion type 4 Point Proficiency has now the correct proficiency level for each score.
Version 2.2.2.0
- Adds a button (X) to remove a daily data entry date, if needed, in Custom Data Entry and Term Mode. The X button will show on the top right of the date header when hovering over it.
Custom Mode:
Term Mode:
When clicking on the X button, you'll get a warning message that This cannot be undone. If you choose to hit the Delete button, all the data entered on that day for the student and rubric you have selected will be deleted. If you've clicked on the X by accident or changed your mind, hit the Cancel button.
- Adds 'Show All Data In Data Entry' option for Custom Data Entry.
By default, the 'Show All Data In Data Entry' is unchecked in Custom Data Entry rubrics. This means that under Custom Mode and Term Mode with daily terms, only the Assessed Date shows by default.
This option is found and set when editing the Custom Data Entry under the Develop tab.
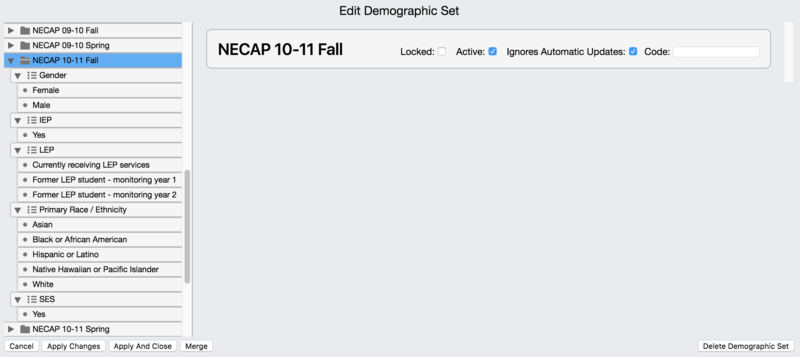
- Adds the ability to hide Demographic Sets, Demographic Variables, and Demographic Values.
There is now a new Active checkbox for demographics. When checked, the demographics are visible. When unchecked, the demographics are hidden. Users with FULL ACCESS will always see and have access to the demographics, no matter if they are marked Active or not.
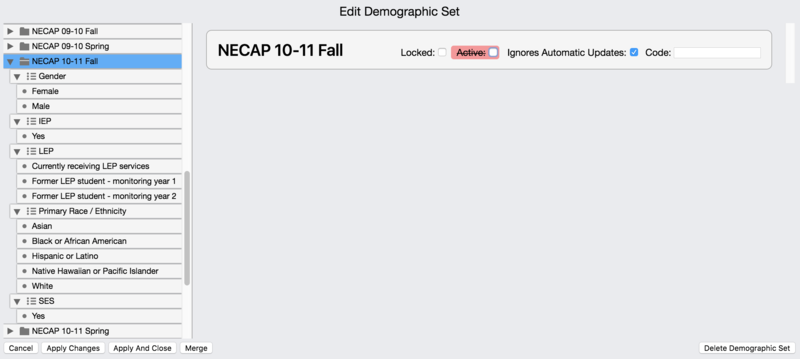
For example, if you wish to no longer have an old NECAP demographic set visible, as it's no longer used by anyone, you can select it, uncheck Active, and hit Apply Changes (or Apply and Close) to save your change. When a demographic set is hidden (no longer visible to regular users), the demographic variables and values within that demographic set are also hidden.
Demographic variables and demographic values can also be independently set to be hidden within a demographic set that is still marked Active and, therefore, visible.
Any changes showing in red (something removed) or green (something edited or added) have NOT been saved yet. Remember to hit Apply Changes or Apply and Close to save the changes you've made.
Fixes:
- Only daily dates with data relevant to the student are now listed in Custom Data Entry mode, even when a group of students is selected.
Version 2.2.1.1
Fixes:
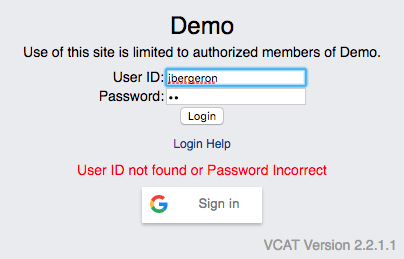
- Reinstates 'User ID not found or Password Incorrect' message in red when the User ID or Password is wrong when trying to log in VCAT.
- 'No current assignments' would sometimes be displayed in the current staff list, even though the staff were assigned to the current year. This display issue has been fixed and will no longer cause confusion.
- Rubrics with criteria that have multiple different terms would sometimes cause columns to be misaligned in the data entry screen. This display issue has been fixed and all columns are lining up.
Version 2.2.1.0
- New Google Sign-In option to log in VCAT!
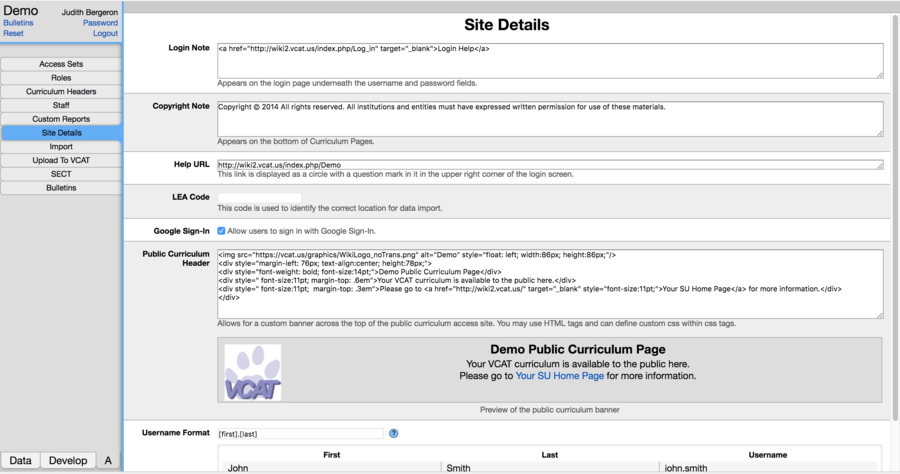
This new feature can be turned on or off on the Site Details, under the A tab. By default, it is unchecked, therefore off. You can turn it on when you are ready for all users to have this option available to them.
When Google Sign-In is NOT checked, the feature is off.
When Google Sign-In is checked, the feature is on.
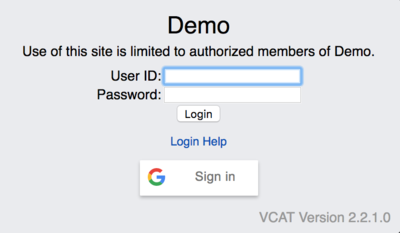
New login window with Google Sign-In:
In order for this new Google Sign-In feature to allow a staff to gain access to VCAT, the email address associated with the staff account in VCAT must be the same as the one used for the Google account.
Click on G Sign in to log in VCAT using your Google account. If you're already signed in Google with the account using the same email as the one entered in VCAT, you will automatically be logged in VCAT.
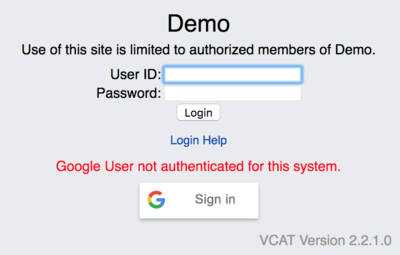
If you click on G Sign in and you have no email in VCAT or your email in VCAT isn't the same as the one associated with the Google account you're logged in with, you will get a message in red that reads: 'Google User not authenticated for this system.'
If you click on G Sign In and you're not already signed in your Google account, the system will bring you to Google and allow you to sign in. Once you're signed in Google using the same email address as the one entered in VCAT, you'll automatically be logged in VCAT as well.
NOTE: Cookies must also be enabled for Google Sign-In to work.
Version 2.2.0.4
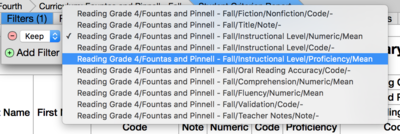
- Now, when using a filter in a student report, the mean will be calculated based on the filter and will display as 'Filter Mean', instead of 'Mean'.
Version 2.2.0.3
- Fix
- Selecting an empty demographic category no longer displays all students.
Version 2.2.0.1
- Fix
- The recalculate button shows for a criterion when its sub criteria have data.
Version 2.2.0.0
- Moves deployment to Amazon Web Services. No functional changes.
Version 2.1.7.5
- Fixes
- Under Data Entry, Export Student to PDF and Export All Students to PDF in Rubric Mode is working again!
- The Confirmation Delete dialog when deleting student groups displays the entire message and allows Full Access users to delete student groups.
Version 2.1.7.2
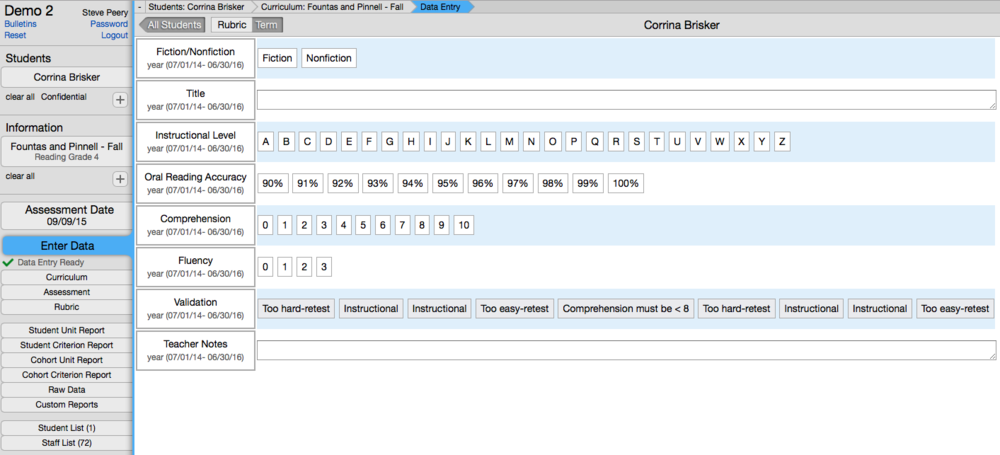
- New Custom Data Entry Mode!! This feature allows to enter data in a 'form' format - which can be very useful for data entry like: EST, MTSS, Student Placement,... For clients interested in developing rubrics and custom reports of such, and clients who already have them in place, we will set up the Custom Data Entry forms for you, similar to what the Custom Reports pdfs look like.
- Rating Description Field now expands vertically as a whole row when being edited. When hovering over the gray shaded bar below the rating description fields, an up and down arrow will be displayed. Just click on it to move up or down to either shrink or expand all of the rating fields at once.
- Criterion Name Field now retains its original size when you go to edit it, and resizes appropriately when editing is complete.
- New Open/Close button icon for side panel. The button to close and open the side panel has now an arrow pointing left to close the left panel (column), or pointing right to reopen it.
This is how the button looks when you hover over it with your mouse:
Version 2.1.6.1
- In Custom Reports, there is now a new binding available called: Daily Term Newest First Repetition. When used in a repetition, it will allow data to be displayed by Most Recent to Oldest. The original binding that displayed Oldest data to Newest has been renamed: Daily Term Oldest First Repetition.
- Headers are now displayed on each page of a Student Criterion Report with multiple pages when printing.
- NEW Student Group Editor!
- The new Student Group Editor allows you to manually assign and unassign existing students and staff, link and unlink grades and curriculum, access any student group from within the same dialog, merge staff, students, and curriculum assignments between groups, and delete a group.
- To access the Group Editor dialog, simply hover hover a group and click on the i.
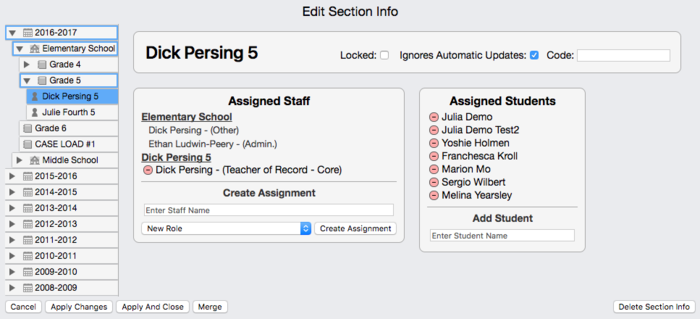
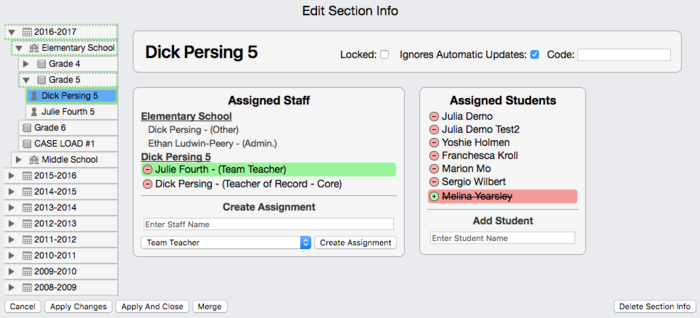
- From within the dialog, you can access any other group on the left, and even edit multiple groups before saving your changes.
- When changes are made, the group directly affected will be displayed with a green solid border and its associated groups higher in the hierarchy with a dotted green border. The actual changes being added will be highlighted in green, and anything being removed will display in red with a strikethrough until changes are saved or cancelled.
- To Save your changes, you can either click on Apply Changes - to save the changes and remain in the edit dialog, or Apply and Close - to save the changes and close the dialog.
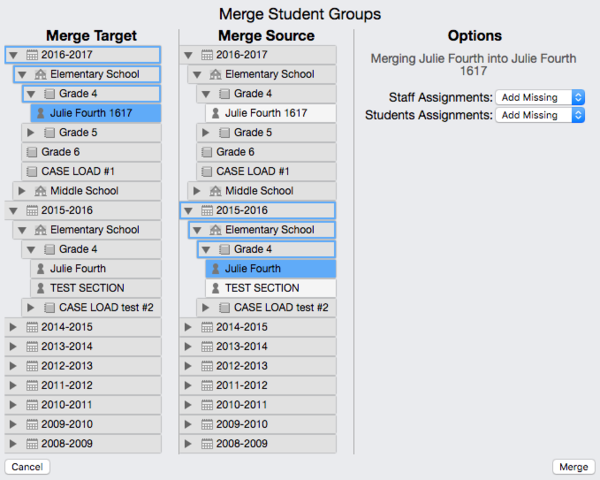
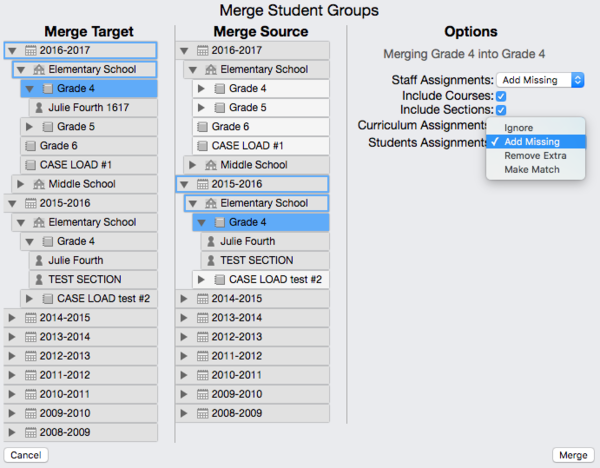
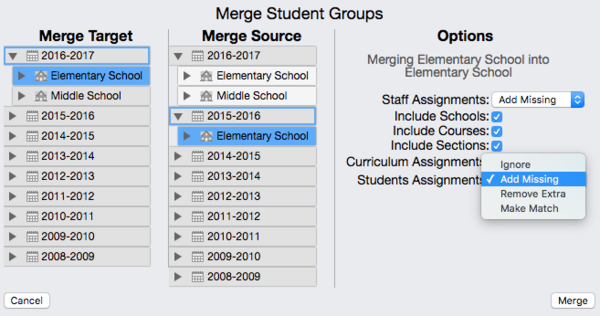
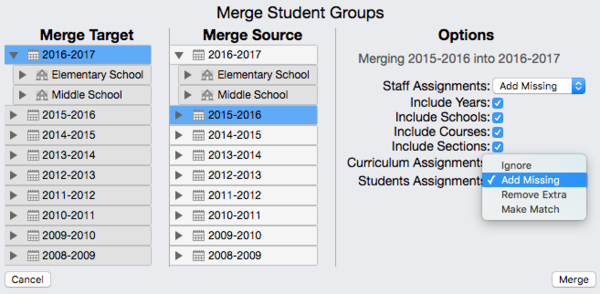
- The Merge feature is available at the Section, Course, School, and Year level, and each level offers options. For Staff, Curriculum, and Students assignments, you have the choice to Ignore, Add Missing, Remove Extra, or Make Match.
- Before clicking the Merge button, you have to select the Merge Target first. Once the Target is selected, then you click on Merge, select the Source, set the options, asend click Merge.
- No worries, when using the Merge feature, you will have the opportunity to review the changes involved with the merge (they will be highlighted) and make adjustments if needed before saving them. The Cancel button will also be available.
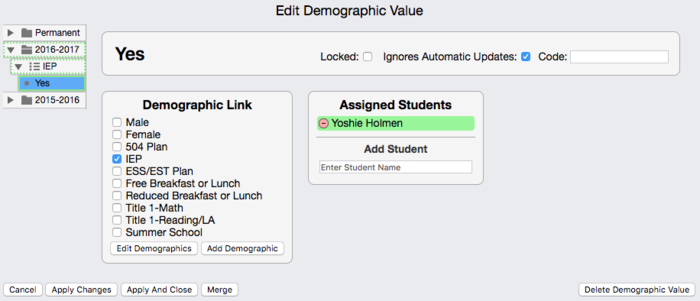
- The new Student Group Editor is also used for Demographics Groups. It allows the user to edit Demographic Sets, Demographic Variables, and Demographic Values, and manually update existing students demographics, as well as merging student assignments between demographic groups.
- The Merge feature is helpful if you are manually updating students demographics. In the example below, it is merging the students assignments from demographic set 2015-2016 into the one called 2016-2017.
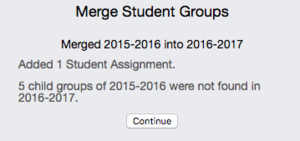
- Right after clicking the Merge button at the bottom right, an overview of the changes are presented in a word form. Just hit Continue to better see and understand the changes created by the Merge.
- When changes are made, the group directly affected will be displayed with a green solid border and its associated groups higher in the hierarchy with a dotted green border. The actual changes being added will be highlighted in green, and anything being removed will display in red with a strikethrough until changes are saved or cancelled. Any edits can still be done before changes are saved.
- Fixes:
- The curriculum page prints correctly now in Chrome.
- Data Import feature under Data Entry is no longer case sensitive.
- Clicking Cancel while running a student criterion report with a filter no longer gives you an error.
- Display has been improved on PDFs of vertical series report.
Version 2.1.5.1
- A new tag [STUDENT_GRADE_ON_DATE] is now available to be used in custom reports to display the student grade on the date the report is run.
- The 'Time' term is now available under the Edit All Terms feature.
- Fixes:
- Links to Demographic Value Conditional bindings are being saved and displayed correctly.
- In reports, clicking the Clear button under the Groups & Demographics menu functions correctly and no longer causes an error.
Version 2.1.5.0
- Allows daily data displayed in custom reports to be limited by terms.
- When an individual student is selected, data entry is automatically in Rubric mode, as opposed to the usual All Students mode.
- Clicking outside of a dialog with a Close or Cancel button closes or cancels the dialog without having to click directly on the button.
- Improves the navigation in the Develop section by maintaining the selected page when appropriate and pre-selecting either the curriculum, assessment, or rubric page (in that order) as the initial page, based on which one has content.
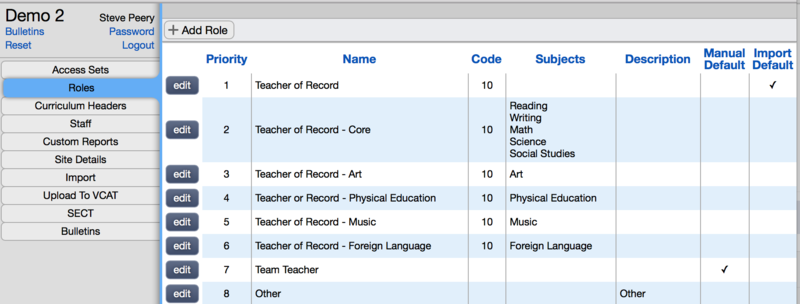
- Allows a different default role to be selected for the import process and for manual staff assignment.
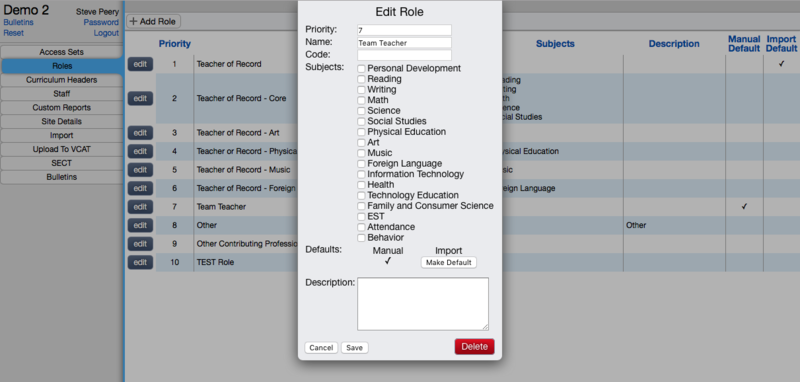
To set the default role, go to A tab, Roles, click the Edit button in front of the role you want to set as default, click on Make Default, hit Save. By selecting a role to be set as default also unselects the role previously set as default.
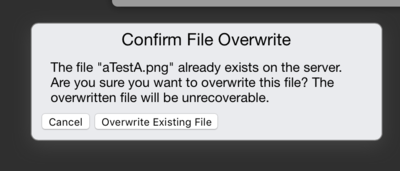
- Adds a confirmation dialog in the Upload to VCAT feature when uploading a file that will replace an existing one.
- Moves the Hispanic or Latino demographic under the 'Permanent' demographic set.
- Fix:
- Date data in data entry section is now displayed as dd/mm/yy.
Version 2.1.4.2
* Dramatically improves report generation time.
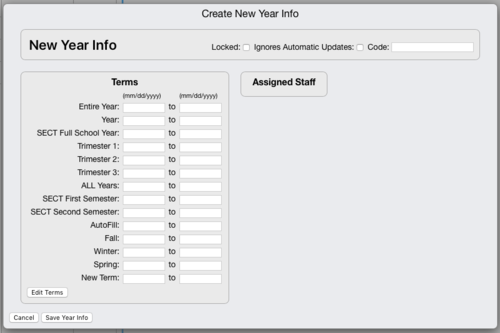
* New Year Info, School Info, and Course Info dialogs if needed to be manually created. When using the importer to update students and teachers assignments, the importer takes care of adding the schools, courses, and the new year as well, but if you want to manually add the new year, you can now do so by clicking the little '+' sign at the bottom of the Year column, under the Data tab.
The new Year Info dialog lets you enter date ranges at the same time you create a new year. Click in 'New Year Info' field to rename the year. Click on Save Year Info to save.
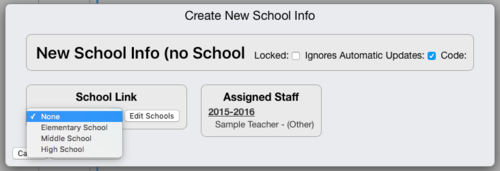
The new School Info dialog lists the schools to choose from, and displays any staff that may be assigned at the Year level. Click on Save School Info to save.
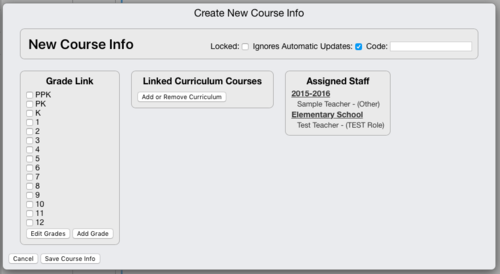
The new Course Info dialog allows you to link curriculum as you create the new course, and displays any staff that may be assigned at the Year and School levels.
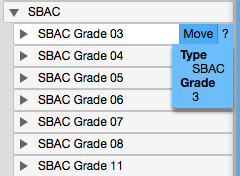
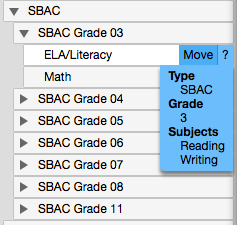
* Adds tool tip (?) to curriculum nodes that gives information on any Type, Grade, and Subject linked to that curriculum. No matter if it is a curriculum folder, course, or unit, Type, Grade, and Subjects links (all three) will show if there are any links made at that level or inherited from a higher level.
To get the tool tip to show, simply hover over to the right of the curriculum name.
Example of a curriculum folder (SBAC) with only the Type linked to it:
Example of a curriculum course (SBAC Grade 3) with the Type, and Grade links:
Example of a curriculum unit (ELA/Literacy) with the Type, Grade, and Subject links:
Version 2.1.3.0
- The Bulletins blue link only shows if there is at least one bulletin.
- If any bulletins are 'Active', the number of active bulletins will display to the right of the Bulletins blue link.
- You can now set an Expiration Date on Bulletins! Setting the date a bulletin expires on will allow that bulletin to remain active until that specific day.
- Fixes:
- Rating descriptions are now preserved when importing curriculum units.
- When running the SECT reports, the # of entries and page info update when the selection is changed.
Version 2.1.2.1
- New SECT Section now available under the 'A' tab. This year, SUs will be able to upload their SECT files DIRECTLY to the State right from VCAT!!! Check out the SECT section of the Wiki.
- New Birth Date format (mm/dd/yyyy) will sort in chronological order in the reports when this student field is the first column.
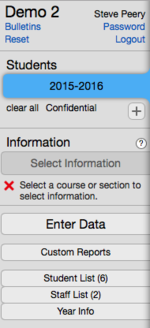
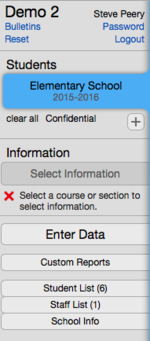
- Select Information is now grayed out with a message showing below it that reads 'Select a course or section to select information' when only a Year or Year/School has been selected.
- New feature: Bulletins! You now have the ability to add messages that will pop up when users log in VCAT. Priority level (Low, Medium, High) can be set for each message, and they can be individually marked Active (or not) as well.
Priority Levels
When a bulletin is NOT marked as Active (therefore Inactive), its priority will display as a circle (with its priority color), and will be 'closed' - meaning its message will not be automatically displayed. You can simply click on its title to get it to open to display it.
Once the Bulletins window has been closed, you can access them again by clicking on the Bulletins blue link, at the top left, right under your SU/District name (here under Demo 2):
To add, delete, and edit bulletins, you need to go to the 'A' tab and click on Bulletins listed on the left.
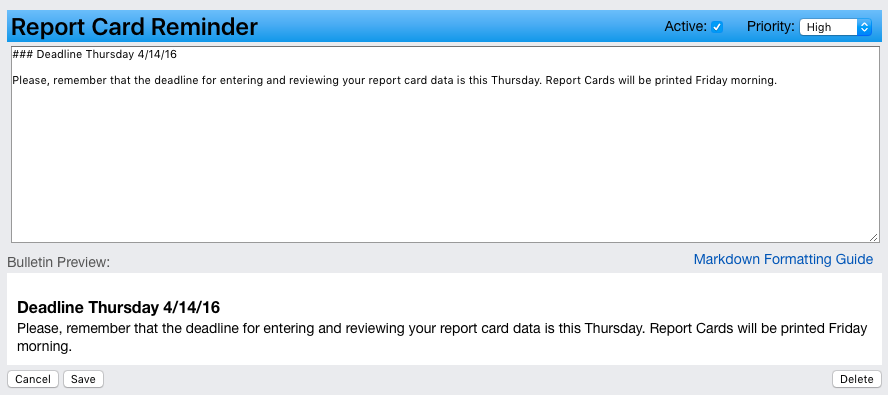
If you click on Edit in front of a bulletin, you can edit its status (Active or not), set its priority level (Low, Medium, High), edit the title by clicking on it and typing what you need, edit the bulletin text right in the box below the title, delete the bulletin by clicking on Delete button on the bottom right corner, and click the Save button when you are done making any changes and want to keep them. The Cancel button will get you out without saving any changes. The Bulletin Preview lets you view what the actual message will look like:
- The feature 'All Students/Raw Data' used to search for the data ever entered for a particular assessment is now faster than ever!
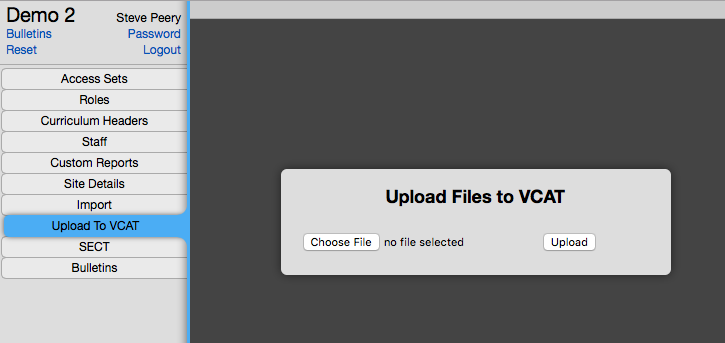
- New 'Upload to VCAT' feature! This feature allows for a secure upload of your files to our ftp server. Under the 'A' tab, click on Upload to VCAT.
- Fixes:
- You can now use demographics in your student selection for data entry.
- When editing students, the demographics are now listed in the same order as they are in your system under the Demographics tab.
Version 2.1.1.2
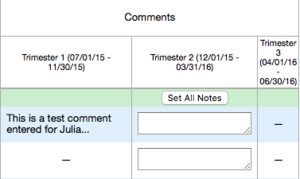
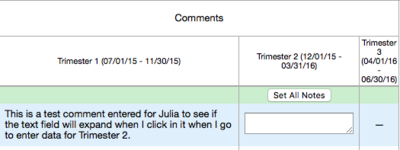
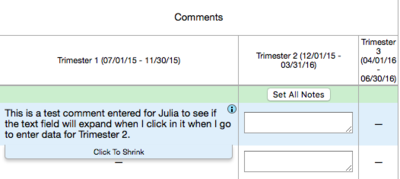
- Adds the ability to expand the text visible in previously entered text fields.
Initially, the previously entered text field may only show part of the text.
Simply click anywhere in the previous text cell to expand it.
Once expanded, click again to shrink it.
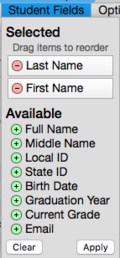
- Adds the Birth Date and Email to Student Fields in the reports.
- Gender Demographic is now part of the demographic set called 'Permanent' in the new importer.
- Adds a document tag [DOB] for Birth Date in custom reports.
- Fixes:
- Under Student Fields in the reports, the Reset button has been removed and the Clear button now resets to the default student fields of Last Name and First Name.
Version 2.1.1.0
- Adds new Student Fields: Middle Name, Birth Date, Email.
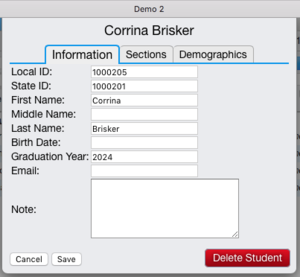
The new student fields are available under the Information tab, when editing a student account, and can also be imported using the new importer!
- Adds an Importer to take care of students and teachers assignments, new student fields, AND student demographics as well.
The Importer uses the files that have been uploaded to our FTP server. In order for the Importer to read and process those files correctly, we first need to set up an agent for you.
The file format has to be .csv (comma separated values) or .txt (tab delimited text).
Here's a sample file:
This sample file has headers but they are not required. If your files don't have headers, we'll need to know what each column represents in order to set up the agent.
As for demographics, each column has its own demographic (IEP, 504, SES,...), and the text within the fields is the demographic value (Yes, M, ...).
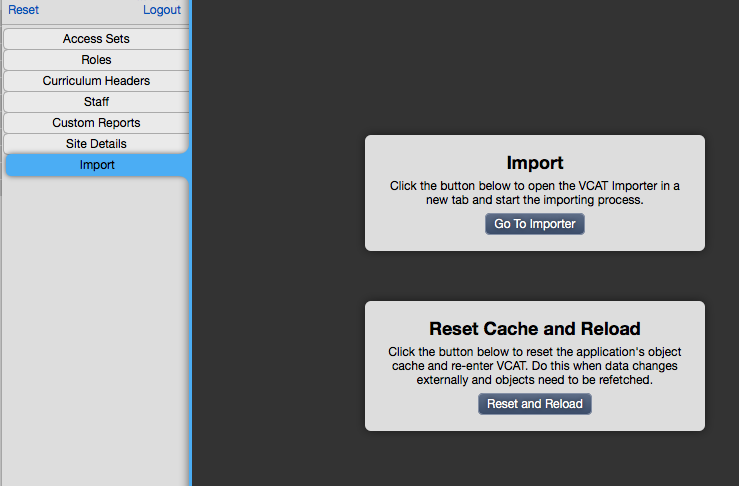
The Import feature is accessible under the A (Admin) tab.
Once your files have been uploaded to our FTP server and your agent has been set up, you will simply click on 'Go to Importer' to run the import.
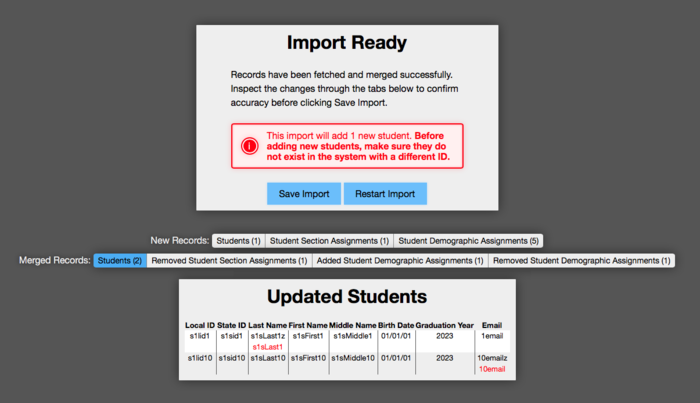
The importer will present you with information on New Records and/or Merged Records, if any.
The New Records include new students and/or staff, and their new assignments, and/or demographics.
Merged records are the changes to existing students and/or staff accounts that the importer will make.
It is strongly recommended that you go through every section to verify that the information is accurate before finalizing the import.
Those changes will only apply after you click on Save Import and then, click on Reset and Reload to update VCAT.
If you wish to get out of the importer, you can click on the Exit button on the top left of the screen. If you just need to make a quick change in VCAT to adjust something, you can do so and then come back and click Restart Import.
Under Merged Records: Students, you will find students with any student field changes (State ID, Last Name, First Name, Middle Name, Birth Date, Graduation Year, Email).
If there are any new students, you will get a RED warning. It is very important to verify that every student listed as new does not already exist in VCAT. This will prevent duplicate students.
If there are any new staff, you will get a similar RED warning as well. It is also very important to verify that every staff listed as new does not already exist in VCAT. Again, this will prevent duplicate accounts, and possible staff access problems.
- Fixes:
- The criterion type 'Related Data' now displays correctly - with the proficiency level colored background and its corresponding value with an asterisk to indicate it is coming from supporting data.
Version 2.0.8.4
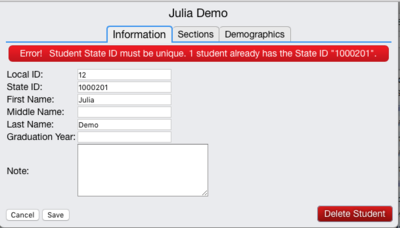
- Adds a State ID check when manually creating a new student account or editing an existing one.
- To emphasize the scale that is entered on the data entry page, its row is now colored light blue in the rubric view when multiple scales are assigned to the criterion.
- Fixes:
- In Individual Series report when students individually selected, the report now displays the student name above each section.
- In Rubric View when under the Data tab, the scroll bar is now visible.
- Copying a unit using Numeric Sum criteria now keeps the criteria and the proficiencies associated with them.
Version 2.0.8.3
- Adds a new 'Site Details' page under the A (admin) tab that includes the following:
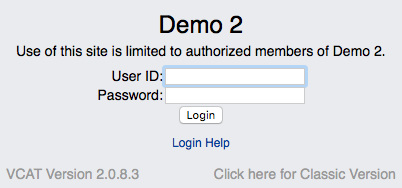
Login Note: This is used when you want to include a link that appears on the login page, right underneath the username and password fields. In this sample, the link is called 'Login Help' and brings the user right to the Log In/Log Out section of the Wiki.
Copyright Note: This information appears on the bottom of Curriculum pages.
Help URL: This link is displayed as a circle with a question mark in it in the upper right corner of the login screen when your mouse hovers over.
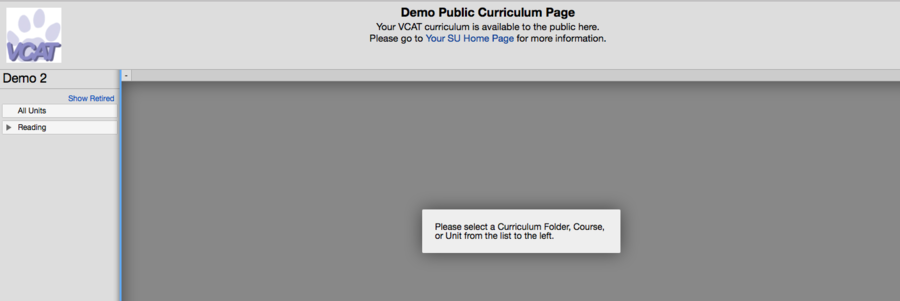
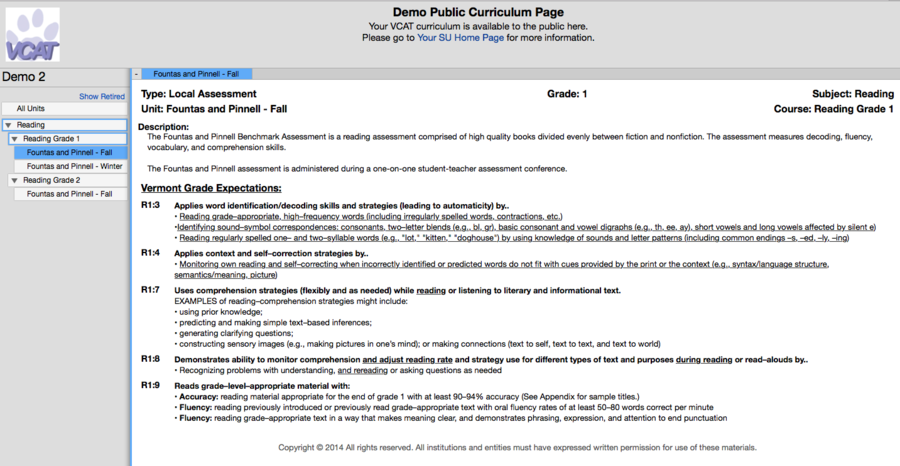
Public Curriculum Header: This field allows you to create a custom banner across the top of the public curriculum access site. You may use HTML tags and can define custom css within css tags. There is also a preview of the public curriculum banner right below the field. You can view a sample of a Public Page below.
- New Public Page layout. The public page has been redesigned with the format of VCAT2. The curriculum made public is listed on the left and only gives access to the Curriculum page of the units.
- Adds a new binding called 'Assessment Date' to display the date assessed when used in Custom Reports.
- Fixes:
- The Export feature is now working for Individual Series report.
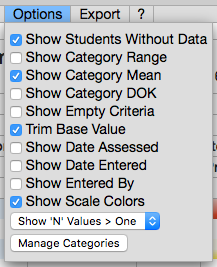
- 'Show Category Mean' option is now functional.
- Clicking on Individual Students works correctly now with a slow click.
- When running reports for Individual Students as the cohort in Confidential Mode, the cohort listed also becomes confidential - just like each individual student.
- Criterion with long list of numeric values are no longer shortened (displayed with '...') when it has other scales assigned.
Version 2.0.8.0
- Adds the ability to recalculate a composite score to update data already entered. When you need to make a change for a composite score and data has already been entered, you can now make the change, then click on the Recalculate button (refresh arrow on the left side of the criterion) to have the system recalculate the new composite scores and update the existing data.
- Adds the new filter to Show/Hide students without data in reports. When running a student criterion report, you now have the options to hide students without data. By default, Students Without Data is checked. To hide the students without data, just remove that check and it will update the report.
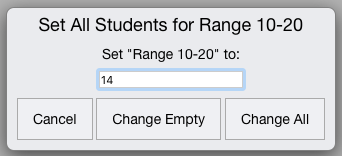
- The All Students feature is now available in data entry for criteria with a score range.
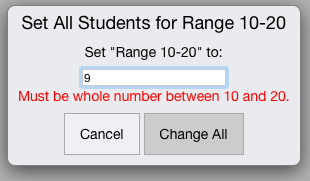
If you enter a score that is out of range, the system will warn you and will not accept the out-of-range score.
If there is already some data entered, the dialog will give you the option of filling in all the scores or just scores for the ones that don't already have data. If you leave the box blank, you can remove existing data as well using the Change All option.
- The Criterion TYPE now displays in Edit Rubric mode. In this example, the criterion type is Complete.
- The Toggle Dev functionality was moved to the Numeric Scale.
When you hover over Numeric Scale, you will see a zoom in icon appear (magnifying glass type of icon with a + sign). (Sorry it doesn't show on the screenshot)
When clicking on Numeric Scale, it will open up and give you 3 options: Score Range, Code Value, and Code.
To close those options, click on Record. When you hover over Record with your mouse, it will show the zoom out icon. (Sorry, it doesn't show on the screenshot)
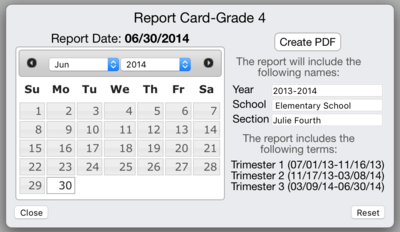
- Adds the ability to run previous year's custom report for a current student group. You can now select a current student group, click on Custom Reports, select a custom report (last year's report card for example), set the date in the calendar that pops up to a previous year's date, and the system will pull the data from that year onto the custom report. If the report pulls general information like 'Year', 'School', and 'Section', the Year will be filled in based on the date selected in the calendar, but the School and Section will be filled in based on the student group selected. You can edit those fields by typing in the appropriate information, if need be, before creating the pdf.
- Fixes:
- Data can now be deleted for criteria with a score range that don't start with 0.
- Criteria using supporting data are now supported in the criterion level reports. The n values are now calculating correctly and will include regular data and data coming from supporting data as well.
Resources 12.9.15
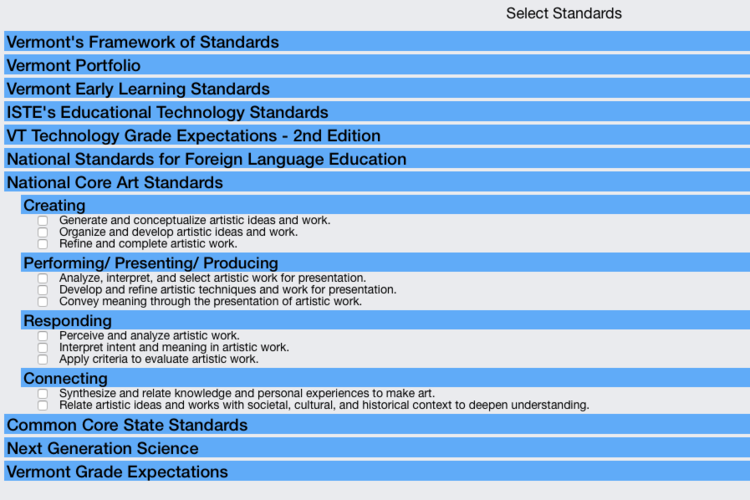
- The anchor standards for the National Core Arts Standards (NCAS) are now available in VCAT.
http://www.nationalartsstandards.org
Version 2.0.7.6
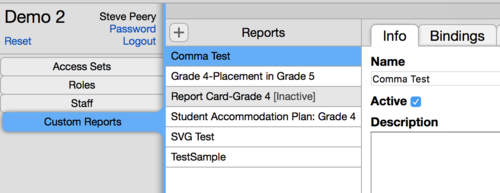
- Added new Active feature for Custom Reports!
Under the A tab, there is now an Active checkbox.
If you uncheck the Active box for the custom report selected, that report will become inactive. Every inactive custom reports will be marked with [Inactive] and shaded gray.
Under the Data tab, the Custom Reports list now has an Active Only checkbox in the filter bar, at the top. By default, the Active Only box is checked.
If you uncheck the Active Only box, all inactive custom reports will be included in the Custom Reports list.
- Added the ability to set the proficiency scale using a range of scores. This range editor supports all scales, except the code scale.
When Editing rubrics, click on Add Scale for the criterion you wish to edit and select Proficiency. It will add a row called Proficiency.
To edit the proficiency, click in the row.
All the ratings are separated by little green knobs. To mark a proficiency range, hover over the green knob where you wish to divide the range. It will display ]|[. Click on it to set your divider. The divider will then show in blue.
If you wish to remove a divider, hover over with your mouse and it will show <X and X> in red on each side of the divider.
If you click on the <X, the divider will be removed and the range will extend to the nearest divider on the left.
If you click on the X>, the divider will be removed and the range will extend to the nearest divider on the right.
If you wish to move the divider, click on the <|> blue symbol between the red X symbols, it will set the 'movement mode' for that divider and will look like this.
In 'movement mode', you can move a divider anywhere you wish to by simply clicking on the divider or green knob where you need it to be.
Once you have the ranges set, click in that range within the proficiency row to set its proficiency level.
To get out of edit mode for the proficiency scale, just click anywhere outside of that row.
As always, if you wish to completely remove the proficiency scale row (entire row), click on the red minus sign to the right of the row.
- Fixes:
- In the Common Core Standards Math, the Standards for Mathematical Practice now display correctly and are selectable.
- Fixed Invalid Key Exception experienced by a few users when using 'login as a user' feature.
Version 2.0.7.3
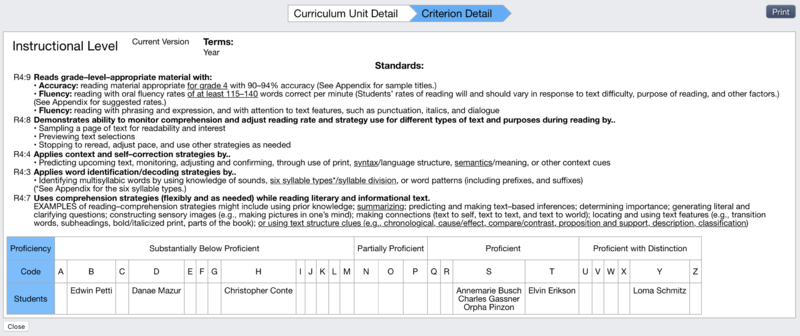
- Added print capability to the Criterion Detail report:
1.When running a criterion report (student criterion report or cohort criterion report), hover over the criterion name with your mouse to see the little blue i appear on the left.
2.Click on the i to create the Criterion Detail report. The print button will be at the top right corner.
- Updated styling of the retired curriculum units in the information selection. The units are shaded darker and identified with the word RETIRED preceding the unit names.
- Retired units are now hidden from the information list when the filter is set to 'Show information for data entry'. They can be made visible by checking the Show Retired box when the filter is set to either 'Show all information', 'Show current and historical information', or 'Show current information'. See example below.
- A tab (Admin tab): added the 'login as a user' feature to the staff section.
- Data import via Data Entry window works without student names, as long as the students have a Local ID and/or State ID.
- Fixes:
- In the Develop tab, filtering by retired units (Show Retired) has been fixed.
Version 2.0.7.0
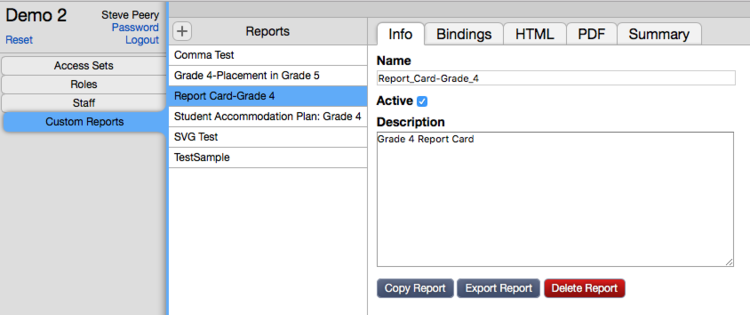
- Custom Reports section under 'A' tab is now complete. It allows you to create custom reports; bindings, conditional, terms, PDF, view report, export/import fo files, export/import custom reports, copy report, and delete a report.
- New 'All Information' feature available for individual students. Under Individual tab, select student(s), click Select Information, select All Information at the top of the list, click on Raw Data (above Custom Reports). The data displays as a spreadsheet and can be exported.
- 'Ignores Automatic Updates' feature available at the Year, School, Course, and Section level. When checked, it will prevent the assignment import to change it.
- All Students note field data entry supports multiple lines, and now allows to remove notes from all students.
- Export to PDF with Colors!! You can now export a student criterion report that has colors into a pdf with colors as well.
- New Data Entry Export/Import: right from the Data Entry screen, a group of students with or without data can be exported, and reimported with new data. This feature no longer needs the complete curriculum paths in order to import data, it uses the criterion names from the unit selected.


