Difference between revisions of "Demographics"
From VCAT WIKI
(→Manual Updates (UNDER CONSTRUCTION)) |
(→Automatic Updates) |
||
| Line 9: | Line 9: | ||
* If an SU is using our [[VCAT Import - Assignments|VCAT Import - Assignments]] feature and their Student Information System houses the students demograhics, demographics can be added to the AutoSend file(s) to be automatically updated when the importer is run. Make sure to let us know when demographics are added so we can adjust the agent to include them in the import process. | * If an SU is using our [[VCAT Import - Assignments|VCAT Import - Assignments]] feature and their Student Information System houses the students demograhics, demographics can be added to the AutoSend file(s) to be automatically updated when the importer is run. Make sure to let us know when demographics are added so we can adjust the agent to include them in the import process. | ||
| − | *When the students demographics are maintained in the Student Information System | + | *When the students demographics are maintained in the Student Information System, part of the AutoSend file(s), and we have set them up for you, running the importer is all that is needed to update them in VCAT. |
| − | + | ||
=== Manual Updates === | === Manual Updates === | ||
Revision as of 17:09, 11 January 2017
Contents
Student Demographics
- Demographics can be kept up-to-date in VCAT and used to inform on student performance when running reports.
Automatic Updates
- If an SU is using our VCAT Import - Assignments feature and their Student Information System houses the students demograhics, demographics can be added to the AutoSend file(s) to be automatically updated when the importer is run. Make sure to let us know when demographics are added so we can adjust the agent to include them in the import process.
- When the students demographics are maintained in the Student Information System, part of the AutoSend file(s), and we have set them up for you, running the importer is all that is needed to update them in VCAT.
Manual Updates
- When student demographics are not maintained in the Student Information System, they can be manually updated in VCAT.
Assigning/Unassigning Students to Existing Demographics
- Students can only be assigned to existing demographics. If the demographic doesn't exist yet, you will need to create it first.
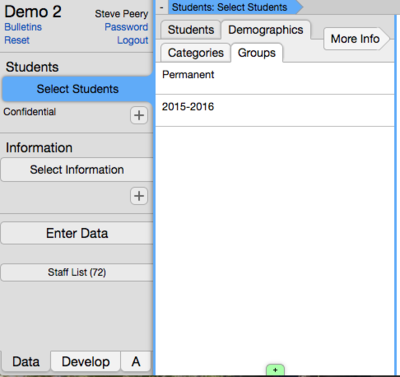
- Under the Data tab, click on Demographics and Groups.
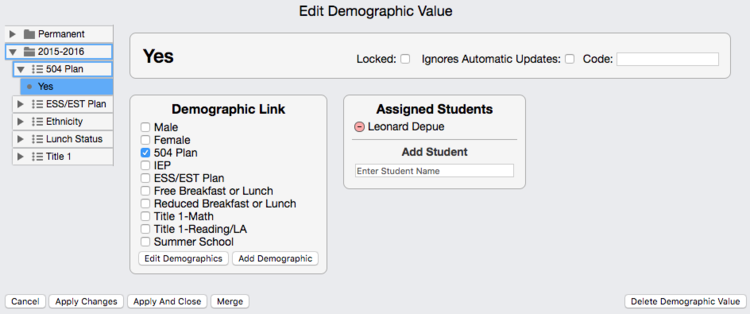
- You can choose to select the specific demographic set, demographic variable, and demographic value you're interested in, and click on the i that appears when you hover over it with your mouse OR you can click on anyone's little i, and you can select the one you're interested in on the left in the Edit Demographic dialog.
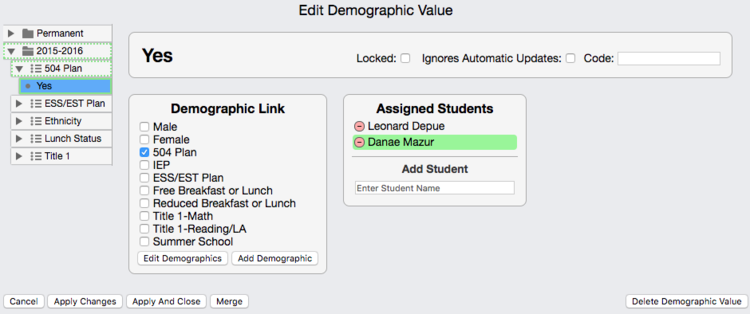
- To assign a student to this demographic value, type part of his last or first name in the field under Add Student to search the student and click to select. The student name will show under the Assigned Students with a green background. The color green indicate that this is an added unsaved change. If you pick the wrong student, you can remove it by clicking on the red circle in front of his name.
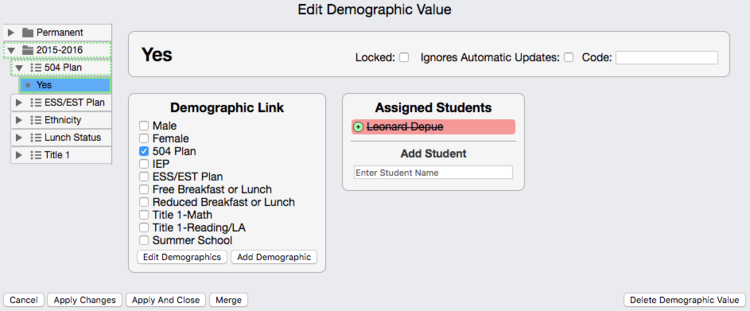
- To unassign a student already assigned to this demographic value, click on the red circle in front of his name. The student will display in red with a strikethrough until changes are saved.
- It is possible to assign and/or unassign multiple students to different existing demographics within the same editing dialog. You can go from one demographic to another by navigating on the left in the dialog, and selecting different ones. Each demographic value edited will show with a solid green border, while its related demographic variable and demographic set will display a dotted green border, to indicate that changes have been made but have NOT been saved yet. When you are done, click on Apply Changes - to save the changes and remain in the dialog - or click on Apply and Close - to save the changes and close the dialog.
Creating New Demographics
- Each Demographic Variable (eg IEP, 504, Gender, ...) must have a Demographic Value ( Yes, Y, Female, Male, F, M, ...) and needs to reside within a Demographic Set (eg Permanent, 2015-2016, 2016-2017,...).
- Gender, Race, and Ethnicity should be part of a demographic set called Permanent.
- Any demographics that can vary through the year, and from one year to another, should be kept in a specific yearly demographic set (2015-2016, 2016-2017,...).
Demographic Set
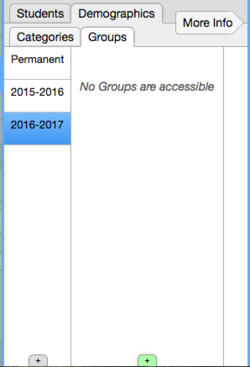
- Under Demographics and Groups (under Data tab), click on the + at the very bottom of the Demographic Set column to add a new demographic set (like 2016-2017).
- The newly created set is called New Demographic Set by default. Click in the field to type in the appropriate name.
- Click on Apply and Close to save the new demographic set and close the dialog.
- The next step is to add a Demographic Variable to this newly created demographic set.
Demographic Variable
- Select the Demographic Set in which you wish to add a Demographic Variable.
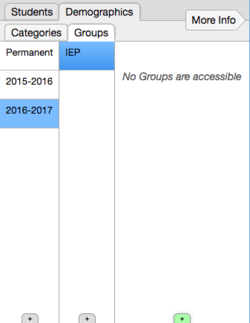
- Click on the + at the very bottom of the Demographic Variable column to add a new one (eg IEP, 504, Lunch Status, ...)
- The newly created variable is called New Demographic Variable by default. Click in the field to type in the appropriate name.
- By default, 'Ignores Automatic Updates' is also checked. Keep it checked if there will not be any automatic updates done using the importer.
- Ignore the code as it is only relevant with the automatic updates using the importer.
- Click on Apply and Close to save the new demographic variable and close the dialog.
- The next step is to add a Demographic Value to this newly created demographic variable.
Demographic Value
- Select the Demographic Variable in which you wish to add a Demographic Value.
- Click on the + at the very bottom of the Demographic Value column to add a new one (eg Yes, Y, ...)
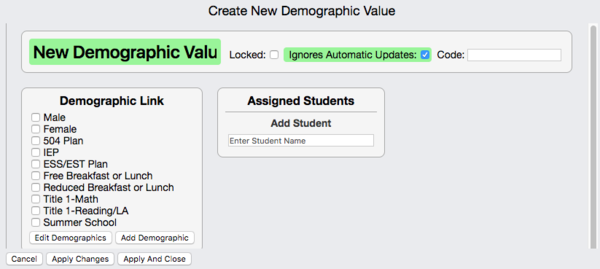
- The newly created value is called New Demographic Value by default. Click in the field to type in the appropriate name.
- By default, 'Ignores Automatic Updates' is also checked. Keep it checked if there will not be any automatic updates done using the importer.
- Ignore the code as it is only relevant with the automatic updates using the importer.
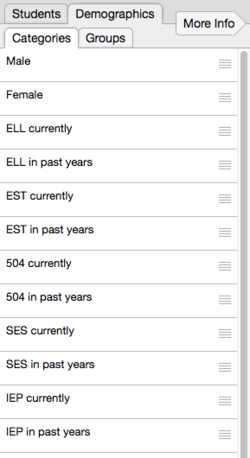
- The Demographic Link section lists all the existing Demographic Categories. Demographic Categories can have multiple links from demographic values across multiple years therefore, they are handy to use in reports when you wish to look at student data for a specific category. Here's a sample with multiple Demographic Categories set up for Current and Past Years demographic categories to facilitate data analysis in reports:
In this sample, you would select any category identified with 'currently' if you were interested only in the Current Year, and Past Years if you were interested in knowing if the students were ever previously assigned to that category.
- Click on Apply and Close to save the new demographic variable and close the dialog.


