Difference between revisions of "Curriculum Options"
(→Build New Curriculum) |
(→Add Scale) |
||
| Line 143: | Line 143: | ||
==== Add Scale ==== | ==== Add Scale ==== | ||
| − | * When clicking on Add Scale, you will get the list of the scales that are available. | + | * When clicking on Add Scale, you will get the list of the scales that are available. Click on the scale you wish to add. |
[[File:Wiki2_AddScale_Options.png|200px]] | [[File:Wiki2_AddScale_Options.png|200px]] | ||
Revision as of 17:28, 22 January 2016
Contents
Build Curriculum
All the curriculum is built under the Develop tab.
To add a Curriculum Folder
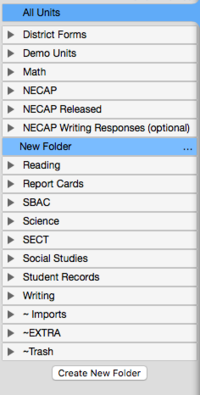
- Click on Create New Folder button at the bottom left. It will add a folder called 'New Folder'.
- Click on the 'New Folder' in the left column.
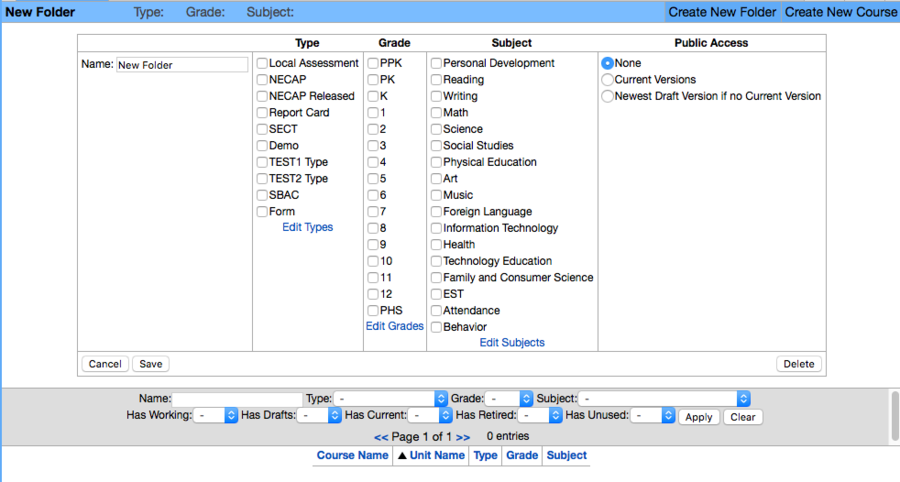
- Click on the bold words New Folder, on the top bar.
- It will drop down a section where you can edit the folder name, and assign Type, Grade, and Subjects (optional at the folder level). Type in the real name of the folder and hit Save. You will see a 'Changes successfully saved' message within a green background appear at the top, with the folder renamed.
- From here, you can 'Create New Folder' or 'Create New Course' (see top right bar).
To add a Curriculum Course
- Select the folder you want the new curriculum course to be part of.
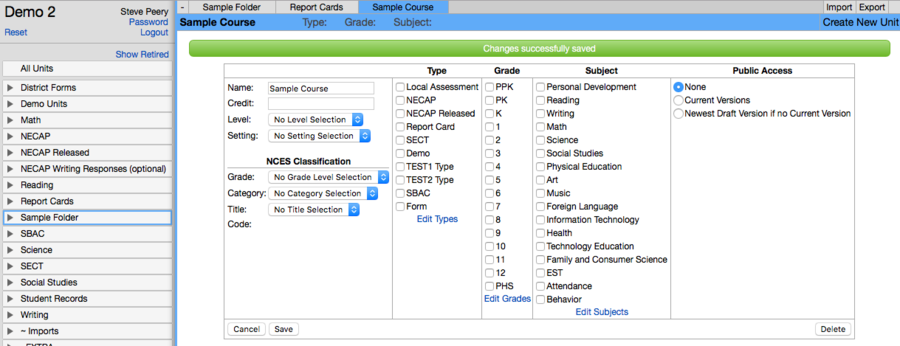
- On the bar at the top right, click on 'Create New Course' and a 'New Course' will be created. In this example, I added this course to a folder called 'Sample Folder'. Initially, that folder was empty and didn't display any triangle in front of it. Now, it has a triangle, and it's outlined in blue to indicate that the course I'm on right now is part of this folder.
- To edit its name and assign a Type, Grade, and Subject (if not already inherited from the parent folder), click on the bold words 'New Course' on the top bar.
- From here, you can 'Create New Unit' (see top right bar).
To add a Curriculum Unit
- Select the course you want the new curriculum unit to be part of.
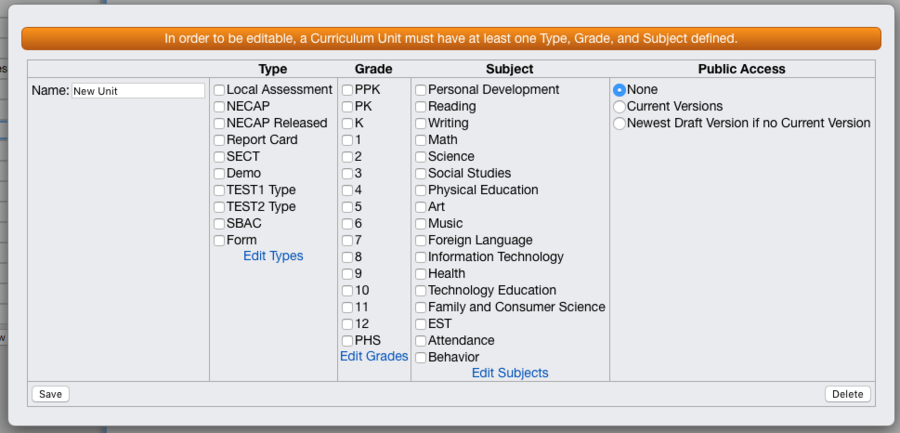
- Click on 'Create New Unit' at the top right on the bar.
- If the course and folder where the unit is going to 'live' do not already have a Type, Grade, and Subject assigned, you will need to assign them before you can edit this unit. Type in the real name for this unit, check the box(es) for the appropriate Type, Grade, and/or Subject, and hit the Save button.
- In this example, the new unit is called 'Sample Unit', and as you can see on the top bar, it has a Type (Local Assessment), a Grade (4), and a Subject (Reading) assigned. This new unit is a Working Version.
To create the Curriculum page
- From the new unit you just created (Working Version), on the Curriculum tab, you have a Description field where you can type more information about this unit.
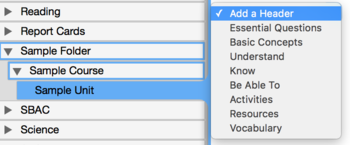
- Click on Add a Header to choose from the options available:
- From this working version, you can click on Preview, at the top, to see what the curriculum page will look like when this new unit is approved.
- Standards for this unit will be listed on this curriculum page after they are linked to criteria in the rubric.
To create the Assessment page
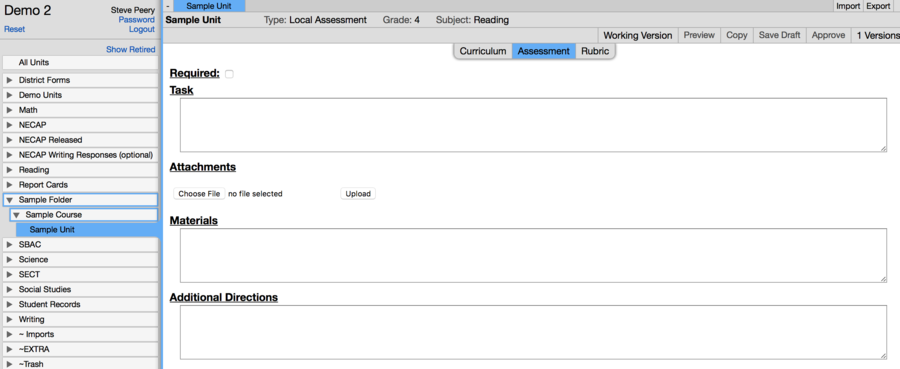
- From the new unit you just created (Working Version), click on the Assessment tab.
- You can mark this unit as required by checking its Required box.
- The Task field lets you type in information about what this assessment is and how this assessment should be administered.
- The Attachments section allows you to upload important pdfs like worksheet, scoring guide, ...
- The Materials section allows you to specify what is needed for this assessment.
- Additional Directions is a field where you can add any pertinent information that may not have been covered by the other fields.
- From this working version, you can click on Preview, at the top, to see what the Assessment page will look like when this new unit is approved.
To create the Rubric
Add Criterion
- From the new unit you just created (Working Version), click on the Rubric tab.
- Click on the Add Criterion bar to add a criterion.
Criterion Type
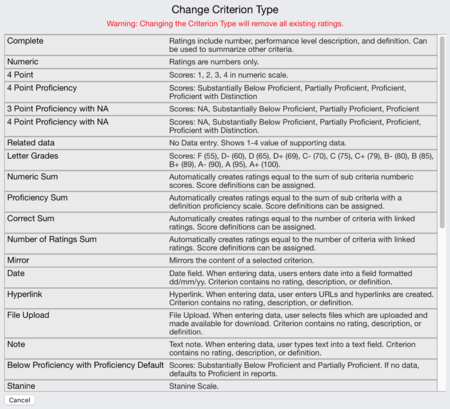
- By default, when you add a criterion, it is of type 'Complete'. If you wish to change that type to a pre-defined type, click on the word 'Type' and it will bring you a list to choose from. The most popular ones are the 4 Point Proficiency with NA, Numeric Sum, Date, and Note criteria. IMPORTANT: Keep in mind that pre-defined criteria don't have the same flexibility as the 'Complete' type and may not allow you to add features like a description or a scale for example. To change the criterion type, click on the one you want from the list and the system will automatically change it. There is no 'undo' or 'back' button on this, so make sure that you really want to change the criterion type to a pre-defined one before clicking on the new type. Hit Cancel if you do not wish to change the type.
- The information about the criterion type only shows in Edit Mode (e.g. Working version or Edit mode on a current version).
Criterion Name
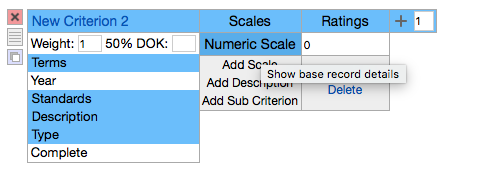
- To set the name of this criterion, click on the words 'New Criterion _' and it will open up a text field. Type in the criterion name then click Done.
Single Ratings VS Score Range
- If the criterion will have a score, you will need to add Ratings. By default, +1 is set and if you click on the +, it will add one rating, starting at a possible score of 0. You can keep clicking the + to add one rating at a time or you can change the 1 for the number of ratings you wish to add before clicking the +.
- If the possible score for this criterion does not start at 0, when clicking the + the first time, click on the 0 to change it to the value you want. When clicking the + thereafter, it will add scores following this initial value.
- IMPORTANT: A criterion set up with single ratings will have a drop-down list of the possible scores to use where you enter data.
- If the criterion will have a greater number of possible scores (like 0-30 for example), it might be best to set it up with one rating having a range of scores from 0 to 30.
- IMPORTANT: A criterion with a score range (one rating - but a range of scores) will offer a text field box where the score will need to be typed in for data entry. It will not have a drop-down.
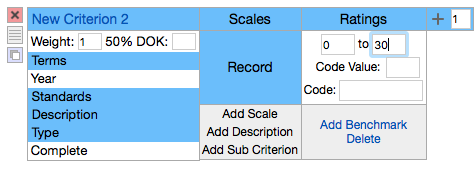
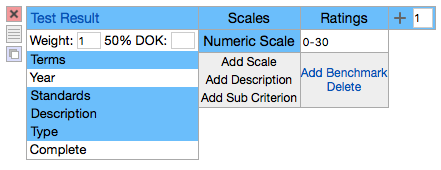
- To set a range of score for a criterion, click on Numeric Scale after one rating has been added.
- Set the beginning and end values of the range.
- Click on 'Record' when you are done.
- If the range of score actually needs to be broken down by proficiency levels, you will need to have the same number of ratings as you will have proficiency levels. In the following example, there will be 4 ratings - set up as 4 ranges to be able to have each one associated with a particular proficiency level.
Add Scale
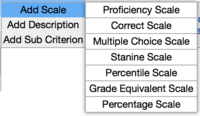
- When clicking on Add Scale, you will get the list of the scales that are available. Click on the scale you wish to add.
Proficiency Scale
Score Ranges
- Click on Add Scale for the criterion you wish to edit and select Proficiency. It will add a row called Proficiency.
- To edit the proficiency, click in the row, then click under the score range you wish to assign a proficiency level. It will open the list of proficiency levels. Just click on the appropriate one to set.
- When you are done and want to get out of edit mode for the proficiency scale, just click anywhere outside of that row.
- If you ever wish to completely remove the proficiency scale row (entire row), click on the red minus sign to the right of the row.
Single Ratings
- Click on Add Scale for the criterion you wish to edit and select Proficiency. It will add a row called Proficiency.
- To edit the proficiency, click in the row.
- All the ratings are separated by little green knobs. To mark a proficiency range, hover over the green knob where you wish to divide the range. It will display ]|[. Click on it to set your divider. The divider will then show in blue.
- If you wish to remove a divider, hover over with your mouse and it will show <X and X> in red on each side of the divider.
If you click on the <X, the divider will be removed and the range will extend to the nearest divider on the left.
If you click on the X>, the divider will be removed and the range will extend to the nearest divider on the right.
- If you wish to move the divider, click on the <|> blue symbol between the red X symbols, it will set the 'movement mode' for that divider and will look like this.
- In 'movement mode', you can move a divider anywhere you wish to by simply clicking on the divider or green knob where you need it to be.
- Once you have the ranges set, click in that range within the proficiency row to set its proficiency level.
- When you are done and want to get out of edit mode for the proficiency scale, simply click anywhere outside of that row.
- If you ever wish to completely remove the proficiency scale row (entire row), click on the red minus sign to the right of the row.
- MORE INFO TO COME
View Existing Curriculum
Under the Data tab:
- Click on Select Information. Use the filters at the top to narrow down the list presented to you. Click on the curriculum course to see the curriculum units it contains.
- Click on the curriculum unit you are interested in.
- If the unit you selected is available to you for data entry, you will be prompted by a calendar, hit cancel.
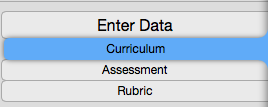
- Click on Curriculum to see the curriculum page.
- Click on Rubric to see the detail of the assessment (what is being measured and how it is measured).
- Click on Assessment to access any attachments (e.g. worksheet, scoring guide,...) that may be available, task details, materials, and any additional directions.
If you have FULL Access or Curriculum Development Access, you can also view the curriculum under the Develop Tab.
Under the Develop tab:
- You can click on All Units and use the filter to locate the course/unit you're interested in in the list. Then hover over the unit name and click on it to go right to it.
- OR, you can navigate in the left column by clicking on the triangle to open the folder and course you're interested in, and clicking on the unit you wish to go to.
- From there, you will see three tabs: Curriculum, Assessment, and Rubric.
- The Curriculum tab will bring up the curriculum page.
- The Assessment tab will bring up a page where you can access any attachments (e.g. worksheet, scoring guide,...) that may be available, task details, materials, and/or any additional directions.
- The Rubric tab will bring you to the detail of the assessment (what is being measured and how it is measured).
Edit Curriculum
Approve Curriculum
Link and Unlink Curriculum
In order to have curriculum/assessments available to teachers for data entry, that curriculum needs to be linked to the student groups at the course level.
Link Curriculum
Here are the steps to link curriculum courses (and their units):
- Select the year, the school, and the course (e.g. Grade 3, Math 4, Literacy 5,...).
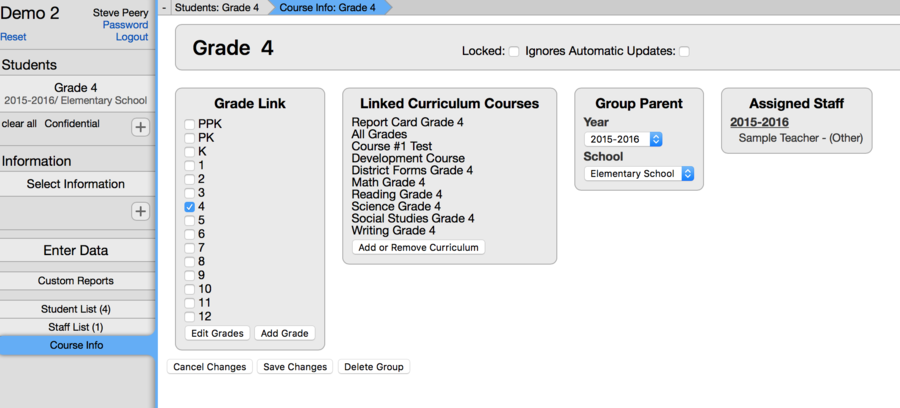
- Click on Course Info in the left column.
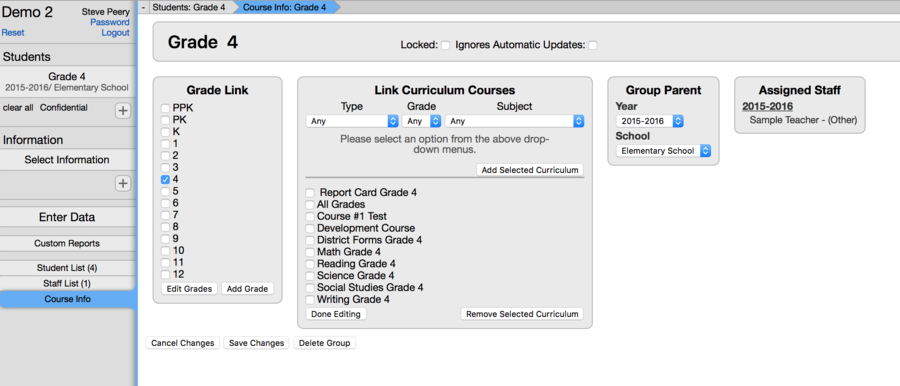
- In the Linked Curriculum Courses section, click Add or Remove Curriculum.
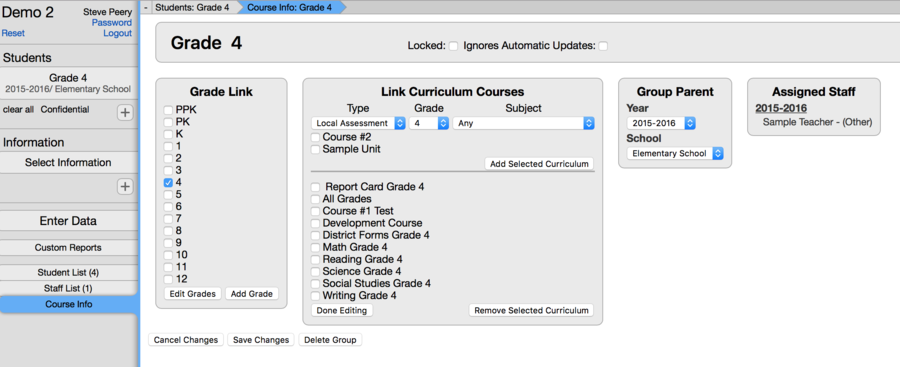
Note: Any curriculum already linked will show below the line under Add Selected Curriculum.
- Select Type, Grade, and/or Subject to populate the list of curriculum/assessments available.
- Check the curriculum you wish to link.
- Click on Add Selected Curriculum. It will move the curriculum you just selected below the line under Add Selected Curriculum.
- If you need to link a different curriculum that didn't show up in the list of curriculum available, change your filter for Type, Grade, and/or Subject to re-populate a new list. Again, check the curriculum you wish to add, and click on Add Selected Curriculum.
- If you are done adding curriculum, click on Done Editing button at the bottom left of the Link Curriculum Courses section.
- Then click on Save Changes below.
Unlink Curriculum
Here are the steps to unlink curriculum courses (and their units):
- Select the year, the school, and the course (e.g. Grade 3, Math 4, Literacy 5,...).
- Click on Course Info in the left column.
- In the Linked Curriculum Courses section, click Add or Remove Curriculum.
Note: The curriculum already linked is listed below the line under Add Selected Curriculum.
- Check the curriculum you wish to unlink.
- Click on Remove Selected Curriculum.
- Click on Done Editing button at the bottom left of the Link Curriculum Courses section.
- Then click on Save Changes below.
