Difference between revisions of "Demographics"
From VCAT WIKI
(→Assigning Existing Demographics) |
(→Assigning Existing Demographics) |
||
| Line 23: | Line 23: | ||
* Under the Data tab, click on Demographics and Groups. | * Under the Data tab, click on Demographics and Groups. | ||
| − | [[File:VCAT2_DemographicsGroup.png]] | + | [[File:VCAT2_DemographicsGroup.png|250px]] |
* You can choose to select the specific demographic set, demographic variable, and demographic value you're interested in, and click on the '''i''' that appears when you hover over it with your mouse '''OR''' you can click on anyone's little '''i''', and you can select the one you're interested in on the left in the Edit Demographic dialog. | * You can choose to select the specific demographic set, demographic variable, and demographic value you're interested in, and click on the '''i''' that appears when you hover over it with your mouse '''OR''' you can click on anyone's little '''i''', and you can select the one you're interested in on the left in the Edit Demographic dialog. | ||
| − | [[File:VCAT2_DemographicsGroup_SelectingDemogValue_i.png]] | + | [[File:VCAT2_DemographicsGroup_SelectingDemogValue_i.png|400px]] |
| + | |||
[[File:VCAT2_DemographicsGroup_EditDemogValue.png|750px]] | [[File:VCAT2_DemographicsGroup_EditDemogValue.png|750px]] | ||
| − | * To assign a student to this demographic value, type part of his last or first name in the field under Add Student to search the student and click to select. The student name will show under the Assigned Students with a green background. The color green indicate that this is an added unsaved change. If you pick the wrong student, you can remove it by clicking on the red circle in front of his name | + | * To assign a student to this demographic value, type part of his last or first name in the field under Add Student to search the student and click to select. The student name will show under the Assigned Students with a green background. The color green indicate that this is an added unsaved change. If you pick the wrong student, you can remove it by clicking on the red circle in front of his name. |
[[File:VCAT2_DemographicsGroup_EditDemogValue_NewAssignedStudent.png|750px]] | [[File:VCAT2_DemographicsGroup_EditDemogValue_NewAssignedStudent.png|750px]] | ||
| + | |||
| + | |||
| + | * It is possible to assign multiple students to different existing demographics within the same editing dialog. You can navigate from one demographic to another by navigating on the left of the dialog, and selecting different ones. Each demographic value edited will show with a solid green border, while its related demographic variable and demographic set will display a dotted green border, to indicate that changes have been made but have NOT been saved yet. When you are done, click on Apply Changes - to save the changes and remain in the dialog - or click on Apply and Close - to save the changes and close the dialog. | ||
=== Creating New Demographics === | === Creating New Demographics === | ||
Revision as of 14:47, 11 January 2017
Contents
Student Demographics
- Demographics can be kept up-to-date in VCAT and used to inform on student performance when running reports.
Automatic Updates
- If an SU is using our VCAT Import - Assignments feature and their Student Information System houses the students demograhics, demographics can be added to the AutoSend file(s) to be automatically updated when the importer is run. Make sure to let us know when demographics are added so we can adjust the agent to include them in the import process.
- When the students demographics are maintained in the Student Information System and part of the AutoSend file(s), running the importer is all that is needed to update them in VCAT.
Manual Updates (UNDER CONSTRUCTION)
- When student demographics are not maintained in the Student Information System, they can be manually updated in VCAT.
Assigning Existing Demographics
- Students can only be assigned to existing demographics. If the demographic doesn't exist yet, you will need to create it first.
- Under the Data tab, click on Demographics and Groups.
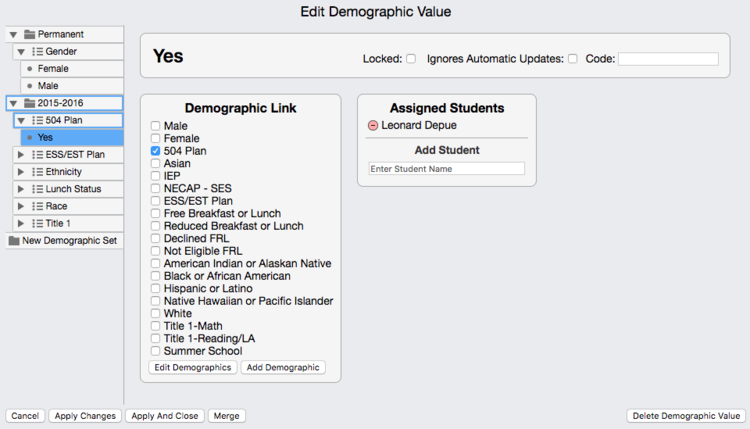
- You can choose to select the specific demographic set, demographic variable, and demographic value you're interested in, and click on the i that appears when you hover over it with your mouse OR you can click on anyone's little i, and you can select the one you're interested in on the left in the Edit Demographic dialog.
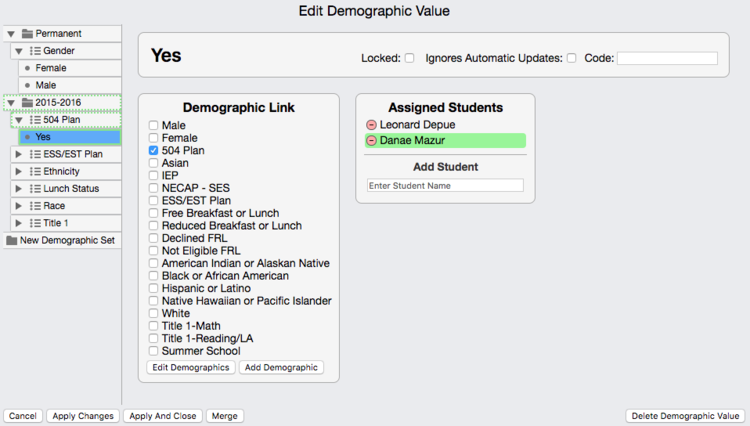
- To assign a student to this demographic value, type part of his last or first name in the field under Add Student to search the student and click to select. The student name will show under the Assigned Students with a green background. The color green indicate that this is an added unsaved change. If you pick the wrong student, you can remove it by clicking on the red circle in front of his name.
- It is possible to assign multiple students to different existing demographics within the same editing dialog. You can navigate from one demographic to another by navigating on the left of the dialog, and selecting different ones. Each demographic value edited will show with a solid green border, while its related demographic variable and demographic set will display a dotted green border, to indicate that changes have been made but have NOT been saved yet. When you are done, click on Apply Changes - to save the changes and remain in the dialog - or click on Apply and Close - to save the changes and close the dialog.
Creating New Demographics
Demographic Assignments
- NOTE: The following steps are included in the next version. UNDER CONSTRUCTION. New version coming soon! :)
Demographic Set
- NOTE: The following steps are included in the next version. UNDER CONSTRUCTION. New version coming soon! :)
Demographic Variable
- NOTE: The following steps are included in the next version. UNDER CONSTRUCTION. New version coming soon! :)
Demographic Value
- NOTE: The following steps are included in the next version. UNDER CONSTRUCTION. New version coming soon! :)


